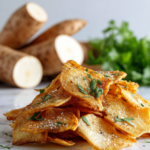
Okra has always been a bit of a mystery to me—slimy when cooked certain ways, but when baked just right, it transforms into something crispy and totally addictive. I love turning it into chips because it feels like sneaking a snack that’s healthy but still satisfying. Plus, baking keeps the process simple, and I don’t have to deal with hot oil splatters or greasy cleanup.
This recipe came from a moment of frustration—trying to find a way to enjoy okra without that slimy texture ruining it. Baking changes everything. It’s about patience, watching it turn golden, and listening for that perfect crackle. Now, it’s become my go-to for a quick snack, especially when I want something crunchy without the guilt or fuss.
Focusing on how baking transforms okra from slimy to crispy, offering a healthy snack that’s surprisingly addictive and easy to make.
The story behind this recipe
- I stumbled upon baked okra chips during a summer visit to my aunt’s farm. Watching her turn a humble vegetable into a crispy snack sparked something in me. That day, I realized that with just a little heat and patience, vegetables could surprise you with their transformation.
- The idea stuck around, and I started experimenting with different coatings and seasonings. It became a quiet obsession, especially on days when I craved something crunchy and healthy. Now, baking okra chips feels like a small act of culinary rebellion—simple, honest, and deeply satisfying.
- heading
Key ingredients for crispy okra chips
- Fresh okra: I prefer small, tender pods that feel firm and have vibrant green color. Skip slimy, larger ones for crispness.
- Olive oil: Use a good drizzle—just enough to lightly coat each pod. It’s the key to that golden, crispy exterior without greasiness.
- Salt: I like a coarse sea salt for that satisfying crunch and burst of flavor with each bite. Adjust to taste, but don’t skimp.
- Paprika or cayenne: A pinch adds smoky heat that complements the okra’s earthiness. Feel free to skip if you want milder chips.
- Optional seasonings: Garlic powder, cumin, or a squeeze of lemon zest can elevate the flavor. Use sparingly, so they don’t overpower the natural taste.
- Baking sheet: Non-stick or lined with parchment helps prevent sticking and makes cleanup easier—crucial for crispy results.
- Cooling rack: I always transfer the chips here after baking to let excess moisture escape, keeping them extra crisp and not soggy under the weight.
Spotlight on key ingredients
Okra:
- Fresh okra: I prefer small, tender pods that feel firm and have vibrant green color. Skip slimy, larger ones for crispness.
- Olive oil: Use a good drizzle—just enough to lightly coat each pod. It’s the key to that golden, crispy exterior without greasiness.
- Salt: I like a coarse sea salt for that satisfying crunch and burst of flavor with each bite. Adjust to taste, but don’t skimp.
Seasonings:
- Paprika or cayenne: A pinch adds smoky heat that complements the okra’s earthiness. Feel free to skip if you want milder chips.
- Optional seasonings: Garlic powder, cumin, or a squeeze of lemon zest can elevate the flavor. Use sparingly, so they don’t overpower the natural taste.
Notes for ingredient swaps
- Fresh okra: I prefer small, tender pods that feel firm and have vibrant green color. Skip slimy, larger ones for crispness.
- Olive oil: Use a good drizzle—just enough to lightly coat each pod. It’s the key to that golden, crispy exterior without greasiness.
- Salt: I like a coarse sea salt for that satisfying crunch and burst of flavor with each bite. Adjust to taste, but don’t skimp.
- Paprika or cayenne: A pinch adds smoky heat that complements the okra’s earthiness. Feel free to skip if you want milder chips.
- Optional seasonings: Garlic powder, cumin, or a squeeze of lemon zest can elevate the flavor. Use sparingly, so they don’t overpower the natural taste.
- Baking sheet: Non-stick or lined with parchment helps prevent sticking and makes cleanup easier—crucial for crispy results.
- Cooling rack: I always transfer the chips here after baking to let excess moisture escape, keeping them extra crisp and not soggy under the weight.
Equipment & Tools
- Baking sheet: To hold the okra during baking for even heat exposure.
- Parchment paper or silicone mat: Prevent sticking and facilitate easy cleanup.
- Mixing bowl: Tossing okra with oil and seasonings evenly.
- Cooling rack: Allow moisture to escape, keeping chips crispy.
- Measuring spoons: Accurately add oil and seasonings.
Step-by-step guide to baked okra chips
- Preheat your oven to 200°C (390°F). Line a baking sheet with parchment paper or a silicone mat for easy cleanup.
- Wash the okra pods gently under cold water. Pat dry thoroughly with a clean towel to remove moisture, which helps achieve crispiness.
- Trim the stem ends of the okra, but keep the pods whole. Slice a small slit on the side if they are very large, to help seasonings penetrate.
- In a mixing bowl, toss the okra with a tablespoon of olive oil. Shake or stir until each pod is lightly coated. Avoid excess oil, which can make chips greasy.
- Sprinkle with coarse sea salt, paprika, and optional seasonings. Toss again to distribute evenly. Adjust salt and spice to taste.
- Arrange the okra in a single layer on the prepared baking sheet, ensuring they don’t overlap. This promotes even crisping.
- Bake in the oven for 15-20 minutes. Check after 10 minutes—give them a gentle shake or flip if needed for even browning.
- Watch for a golden-brown color and a crackling sound. The edges should be crisp, and the okra should feel firm when gently pressed.
- Remove from oven and transfer to a cooling rack. Let them rest for 5 minutes. This step helps any residual moisture escape, keeping them crispy.
- Serve immediately for maximum crunch. If storing, keep in an airtight container at room temperature for up to a day.
Let the chips rest on the cooling rack for 5 minutes. Serve immediately or store in an airtight container. Enjoy the crunch with a drizzle of lemon or a sprinkle of extra salt if desired.
How to Know It’s Done
- Color: Edges are golden brown, not burnt.
- Sound: Crackling when bitten or pressed.
- Texture: Firm, crispy, not soggy or limp.
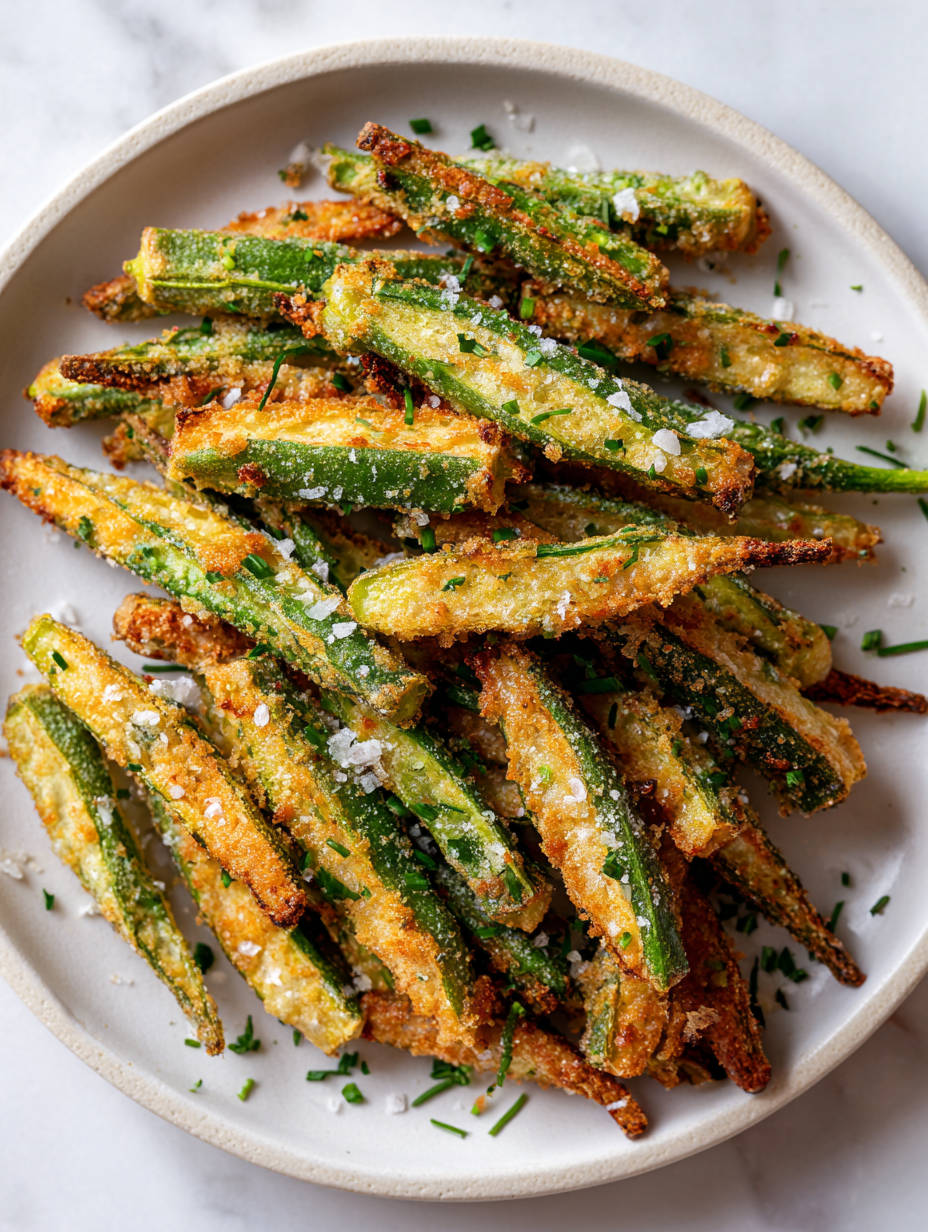
Baked Crispy Okra Chips
Ingredients
Equipment
Method
- Preheat your oven to 200°C (390°F) and line a baking sheet with parchment paper or a silicone mat.
- Gently wash the okra pods under cold water, then pat them dry thoroughly with a clean towel. Well-dried okra helps achieve maximum crispiness.
- Trim the stem ends of each okra pod, keeping them whole. If some are very large, make a small slit on the side to help seasonings penetrate.
- Pour the okra into a mixing bowl, then drizzle with a tablespoon of olive oil. Toss gently until each pod is lightly coated; this helps them turn golden and crispy in the oven.
- Sprinkle the coarse sea salt, paprika or cayenne, and any optional seasonings over the okra. Toss again to ensure even distribution of spices.
- Arrange the seasoned okra in a single layer on the prepared baking sheet, making sure they aren’t overlapping. This promotes even crisping.
- Bake for 15-20 minutes, checking after 10 minutes to turn or shake the pan gently for even browning. The okra edges should turn golden brown and begin to crackle.
- Once crispy and golden, remove the baking sheet from the oven. Transfer the okra to a cooling rack to let excess moisture escape and keep them crunchy.
- Allow the chips to cool for about 5 minutes, then serve immediately for the best crunch. Enjoy them plain or with a squeeze of lemon for extra brightness.
Pro tips for perfect okra chips
- Bolded Mini-Head: Use a light coating of oil to achieve a golden, crispy exterior without greasing the chips.
- Bolded Mini-Head: Pat the okra completely dry before baking to prevent sogginess and ensure crispness.
- Bolded Mini-Head: Keep an eye on the chips after 15 minutes; they can quickly go from perfect to overdone.
- Bolded Mini-Head: Flip or shake the baking sheet halfway through baking for even browning and crunch.
- Bolded Mini-Head: Transfer to a cooling rack immediately after baking to let residual moisture escape and maintain crispness.
- Bolded Mini-Head: Adjust seasonings after baking if needed, as flavors intensify as the chips cool.
- Bolded Mini-Head: For extra crunch, bake a few extra minutes, but watch carefully to prevent burning.
Common mistakes and how to fix them
- FORGOT to pat okra dry: Moisture causes sogginess; always dry thoroughly before baking.
- DUMPED too much oil: Use minimal oil—just enough to coat for crispness, not greasiness.
- OVER-TORCHED the chips: Watch closely after 15 minutes; remove when golden and crackling.
- UNDER-BAKED the okra: If not crispy, bake a few minutes longer, but avoid burning edges.
Quick fixes and pantry swaps
- When chips are soft, increase baking time by 3-5 minutes to crisp up.
- Splash a little lemon juice or vinegar if okra tastes too bitter or flat.
- Patch soggy spots with a quick sprinkle of salt and return to oven for 2 minutes.
- Shield over-browned edges with foil and lower oven temperature slightly for even baking.
- If chips stick, swap parchment for a silicone mat and avoid overcrowding for better airflow.
Prep, store, and reheat tips
- Pre-slice okra pods if desired to save time; keep them in an airtight container in the fridge for up to 24 hours to prevent moisture buildup.
- Store baked chips in an airtight container at room temperature for up to a day; the texture may soften slightly, but they’ll still be tasty.
- Reheat in a 180°C (350°F) oven for 3–5 minutes until crispy again, listening for that satisfying crackle.
- For longer storage, freeze baked okra chips in a sealed bag for up to a month; re-crisp in the oven from frozen for best texture.
- Avoid refrigerating for too long as humidity can make chips soggy; re-crisping in the oven is key to restoring crunch.
Top questions about baked okra chips
1. How do baked okra chips taste?
Baked okra chips are crispy, slightly smoky, with a satisfying crunch that replaces the slimy texture fresh okra often has when cooked differently.
2. Are baked okra chips gluten-free and vegan?
Yes, they’re naturally gluten-free, and you can make them vegan by using plant-based seasonings or oils.
3. How should I store baked okra chips?
To keep them crispy longer, store in an airtight container at room temperature for up to a day, but best enjoyed fresh.
4. What’s the basic baking process for okra chips?
Preheat your oven to 200°C (390°F). Use a parchment-lined baking sheet, toss okra with oil and seasonings, then bake for 15-20 minutes until golden and crackling.
5. What kind of okra works best?
Choose small, tender pods with vibrant green color. Larger, slimier okra won’t crisp up well and can be rubbery.
6. Can I substitute the oil?
You can swap olive oil with avocado or coconut oil for different flavor profiles, but expect slight changes in crispness or taste.
7. What seasonings work well?
Adding a pinch of smoked paprika or cayenne gives a smoky, spicy kick, while garlic powder or lemon zest can brighten the flavor.
8. What if my chips turn out soggy?
If the chips are soggy, return them to the oven for a few extra minutes, watching carefully to prevent burning.
9. How do I keep the chips crispy after baking?
Use a cooling rack after baking to allow moisture to escape, keeping the chips crispy and crunchy.
10. Can I freeze baked okra chips?
Yes, you can freeze baked okra chips for up to a month. Reheat in a 180°C (350°F) oven for 3-5 minutes to regain crunch.
These baked okra chips might just become your new go-to snack—crisp, smoky, and surprisingly easy to make. They remind me that sometimes, simple ingredients and a bit of patience can turn humble vegetables into something memorable. Plus, they’re a gentle way to enjoy okra without the usual slimy texture.
In times when I crave something crunchy and healthy, these chips always deliver a satisfying bite. They’re perfect for last-minute snacking or sharing with friends who appreciate a homemade treat. Honestly, I find myself reaching for them more often than I’d admit, especially when I want a little crunch without the fuss.

Hi, I’m Lily Hayes, the cook, writer, and heart behind Loving This Process. This blog is built on a simple idea that food is not just about the final dish, but about everything that happens while you’re making it. The thinking, the tasting, the adjusting, the learning, and the quiet moments in between. Food has been a constant presence in my life, not as something flashy or perfect, but as something deeply grounding. Cooking has always felt like a process worth savoring, even when it’s messy, slow, or imperfect.


Leave a Reply