There’s something quietly satisfying about taking a humble can of chickpeas and turning it into something unexpectedly smoky and vibrant. Roasting garlic until it’s soft and fragrant, then tossing it with those little beans, feels like capturing a secret moment of warmth and comfort in snack form. It’s not fancy, just honest food that hits the spot after a long day or when you need a little something to nibble on that’s both hearty and flavorful.
This recipe is all about that unspoken joy — the magic of transforming simple ingredients into a snack that tastes like a cozy campfire in your hand. The roasted garlic adds a smoky depth, boosting the chickpeas’ natural earthiness without fuss or complicated steps. It’s perfect for when you want something nourishing but effortless, with a little smoky punch that keeps you coming back for more.
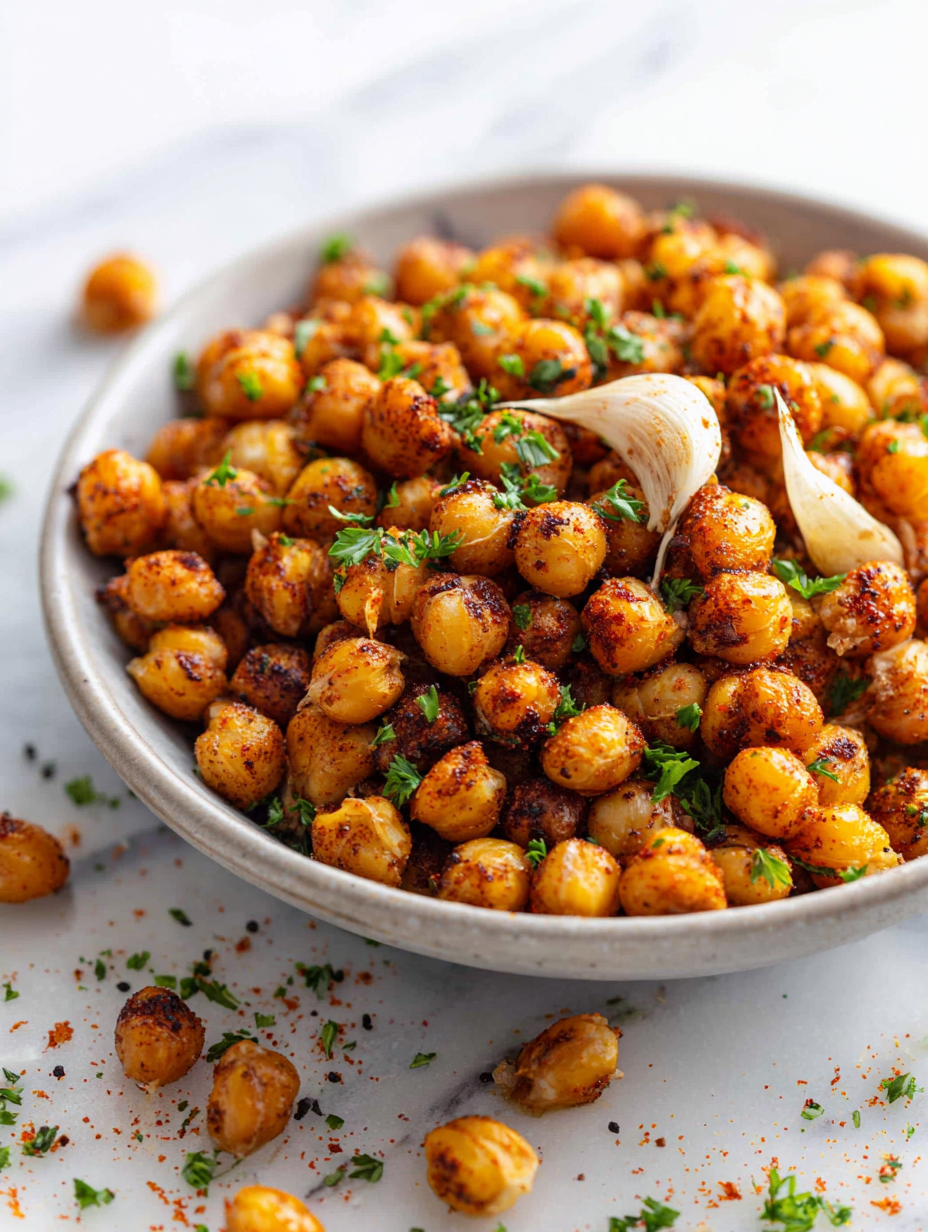
Focusing on the unspoken joy of transforming humble chickpeas with roasted garlic into a snack that tastes like a cozy, smoky campfire in your hand.
The story behind this recipe
I first stumbled on this idea during a chaotic weekend when I had a few cans of chickpeas and a head of garlic that needed using up. Roasting garlic was always a bit intimidating—scary to burn, but so worth it when you get that deep, nutty aroma. One evening, I threw everything together in desperation, and the smoky, tender garlic transformed those humble beans into a snack I couldn’t stop munching on. It’s funny how simple ingredients can surprise you with that cozy, almost campfire-like flavor, especially when you’re craving something satisfying without any fuss.
Key Ingredients and Tips
- Extra virgin olive oil: I love how it adds a gentle fruitiness and helps the garlic roast evenly. Skip it if you prefer a drier texture, but the oil enhances flavor and crunch.
- Garlic: Roasting transforms this into sweet, mellow goodness that’s almost buttery. Don’t rush the roasting—slow it down for richer depth, or crank the heat for a quick, charred punch.
- Canned chickpeas: I drain and rinse well to avoid that canned taste. For crunchier beans, dry them thoroughly before roasting—patience makes a crispy difference.
- Salt: I sprinkle sea salt generously—this is what makes the garlic and chickpeas pop. For a smoky edge, add smoked salt if you have it, but regular sea salt works just fine.
- Paprika or smoked paprika: I toss in a pinch for color and that smoky aroma that makes your nose happy. Adjust quantity based on your smoky craving—more is more here.
- Lemon juice: A splash after roasting brightens everything up, balancing the earthiness. Skip it if you want a more rustic, deep flavor, but I prefer the zing for contrast.
- Optional herbs: Fresh thyme or rosemary can add a fragrant lift, but I keep it simple—sometimes less is more, especially if I want that smoky garlic punch to shine.
Spotlight on Key Ingredients
Garlic:
- Roasting turns this into a sweet, mellow, almost buttery flavor that infuses the chickpeas with smoky richness. Its soft, oozy cloves are a contrast to the crispy exterior of the chickpeas.
- Chickpeas: When properly dried, they become satisfyingly crunchy with a tender interior. Their earthiness deepens as they roast, and they crackle with each bite, offering a nutty aroma that’s both hearty and comforting.
Olive Oil and Smoked Paprika:
- Olive Oil: Adds a gentle fruitiness and helps the garlic roast evenly. It’s essential for achieving that crispy, golden exterior on the chickpeas and for the smooth, caramelized garlic.
- Smoked Paprika: Imparts a deep, smoky aroma that transforms the dish from simple to soulful. The vibrant red color and fragrant punch make it feel like a campfire in your hand, even if you don’t add actual smoke.
Notes for ingredient swaps
- Oil-Free: Use a splash of water or broth to help the chickpeas and garlic roast without oil, though you’ll miss some richness.
- Fresh Garlic: If you’re short on time, minced garlic stirred in after roasting adds flavor, but it won’t have that smoky, mellow depth.
- Canned Chickpeas: Swap for cooked, dried chickpeas—soak overnight and cook until tender. Expect a firmer bite and less saltiness.
- Smoked Paprika: Regular paprika works fine, but it lacks the smoky aroma. Add a pinch of liquid smoke for that punch.
- Lemon Juice: Lime juice can brighten the dish similarly, but it’s slightly more tart and less citrusy than lemon.
- Herbs: Fresh thyme or rosemary can be replaced with dried versions—use half the amount for a subtler flavor.
- Salt: Sea salt can be substituted with kosher salt or flaky finishing salt, which adds a different texture and burst of saltiness.
Equipment & Tools
- Baking sheet: To roast chickpeas and garlic evenly.
- Parchment paper: To prevent sticking and easy cleanup.
- Kitchen towel: To dry chickpeas thoroughly for crispiness.
- Foil: To wrap garlic for roasting.
- Spoon: To squeeze roasted garlic cloves.
Roasted Garlic Chickpeas Guide
- Preheat your oven to 200°C (390°F). Use a baking sheet lined with parchment for easy cleanup.
- Drain and rinse a can of chickpeas thoroughly. Pat them dry with a clean kitchen towel—remove as much moisture as possible for crispiness.
- Take 1 head of garlic, slice off the top to expose cloves. Wrap loosely in foil with 1 tablespoon of olive oil. Roast in the oven for 35-40 minutes until soft and fragrant, smelling nutty and smoky.
- While garlic roasts, toss chickpeas with 2 tablespoons of olive oil, 1 teaspoon of smoked paprika, and a pinch of sea salt in a bowl. Spread evenly on the baking sheet.
- Once garlic is done, let it cool slightly. Squeeze out the softened garlic cloves into the bowl with chickpeas. Toss well, ensuring garlic is evenly distributed.
- Place the chickpeas back in the oven. Roast for another 20-25 minutes, shaking the pan halfway through, until they turn golden and crispy around the edges.
- Check for doneness: chickpeas should be crunchy and slightly browned, and garlic should be oozy and caramelized. If they’re not crisp enough, roast a few minutes longer.
- Remove from oven and let cool on the baking sheet for 5 minutes. Drizzle with fresh lemon juice, toss lightly, and serve warm or at room temperature.
Let the chickpeas cool slightly on the baking sheet for 5 minutes. Toss with a squeeze of lemon juice and serve warm or at room temperature. They’re best enjoyed within a day for maximum crunch.
How to Know It’s Done
- Chickpeas are golden and crispy, with a crackling sound when stirred.
- Garlic cloves are soft, caramelized, and oozy, with a deep, smoky aroma.
- Chickpeas feel firm but tender inside, with a crunchy exterior.
Smoky Roasted Garlic Chickpeas
Ingredients
Equipment
Method
- Preheat your oven to 200°C (390°F). Line a baking sheet with parchment paper for easy cleanup.
- Take the head of garlic, slice off the top to expose the cloves, then wrap it loosely in foil with 1 tablespoon of olive oil.
- Place the wrapped garlic in the oven and roast for 35-40 minutes until the cloves are soft, fragrant, and golden around the edges.
- While the garlic roasts, drain and rinse the chickpeas thoroughly, then pat them dry with a clean kitchen towel to remove excess moisture—this helps them become crispy.
- In a bowl, toss the dried chickpeas with 1 tablespoon of olive oil, smoked paprika, and sea salt until evenly coated.
- Once the garlic is done roasting and cooled slightly, squeeze out the soft, caramelized cloves into the bowl with chickpeas. Mix well to coat the chickpeas evenly with the smoky garlic.
- Spread the seasoned chickpeas evenly on the prepared baking sheet and roast in the oven for another 20-25 minutes, shaking the pan halfway through, until they are golden, crispy, and crackling.
- Once crispy and fragrant, remove the chickpeas from the oven, drizzle with fresh lemon juice, and toss gently to brighten the flavors.
- Let the chickpeas cool on the baking sheet for 5 minutes to firm up, then transfer to a bowl and enjoy this smoky, crunchy snack now or store for later.
Notes
Pro tips for perfect roasted chickpeas
- Bolded mini-head: Ensure chickpeas are thoroughly dried before roasting to achieve maximum crispiness and avoid steaming.
- Bolded mini-head: Toss chickpeas and garlic in oil while still warm from roasting to help the flavors meld and improve crunch.
- Bolded mini-head: For an extra smoky flavor, sprinkle a pinch of smoked paprika directly onto the garlic before roasting.
- Bolded mini-head: Keep a close eye on garlic during roasting; it can go from perfectly caramelized to burnt quickly—lower the heat if necessary.
- Bolded mini-head: Shake the baking sheet halfway through roasting to promote even crisping and prevent burning on one side.
- Bolded mini-head: Squeeze roasted garlic cloves into the chickpeas when still warm for a more integrated, mellow flavor.
- Bolded mini-head: Let the chickpeas cool on the baking sheet for 5 minutes; they firm up more as they rest, locking in crunch.
Common mistakes and how to fix them
- FORGOT to check chickpeas’ dryness? Pat thoroughly before roasting for maximum crunch.
- DUMPED the garlic too early? Roast longer until deeply caramelized and oozy for full flavor.
- OVER-TORCHED garlic? Lower oven temperature or cover with foil to prevent burning and bitterness.
- MISSED the resting step? Let chickpeas cool slightly for better texture and easier handling.
Quick fixes and pantry swaps
- When chickpeas appear soggy, splash with a little vinegar to re-crisp and brighten flavor.
- If garlic isn’t oozy enough, patch with a quick blast under the broiler—watch closely to avoid burning.
- Splash a bit of water or broth if chickpeas are too dry during roasting—keeps them crunchy and flavorful.
- DUMPED too much salt? Rinse chickpeas briefly, then toss with fresh salt for even seasoning.
- When garlic burns, shield with foil and reduce oven to 180°C (350°F) for gentler roasting—your smoky depth stays intact.
Prep, store, and reheat tips
- Pre-roast garlic and store it in an airtight container in the fridge for up to 3 days; the smoky aroma deepens over time.
- Dry chickpeas thoroughly after rinsing; store in an airtight jar for up to 2 days before roasting to keep them crisp.
- Roasted chickpeas are best enjoyed within 24 hours; store in an airtight container at room temperature, where they stay crunchy but may lose some brightness.
- Reheat roasted chickpeas in a 180°C (350°F) oven for 5-7 minutes until warm and crispy again, with a crackle under your teeth.
Top questions about roasted garlic chickpeas
1. How do I know when chickpeas are crispy enough?
Look for chickpeas that are firm, dry, and not mushy. They should feel crunchy when you bite into them after roasting.
2. What if my garlic isn’t roasted enough?
If your garlic isn’t soft and caramelized after roasting, give it a few extra minutes, but watch closely to avoid burning.
3. Can I make this ahead and keep it?
Store leftovers in an airtight container at room temperature for up to a day, or in the fridge for 3-4 days. Reheat in the oven for crispiness.
4. My chickpeas are soft, what went wrong?
If your chickpeas turn out soggy, try spreading them out on a baking sheet and roasting for a few more minutes, shaking halfway through.
5. Can I substitute the smoked paprika?
Use smoked paprika for a more pronounced smoky flavor, or add a pinch of liquid smoke for an extra punch.
6. Can I add herbs to this recipe?
Yes, dried herbs like thyme or rosemary can be added before roasting for extra fragrance, but they can overpower the smoky garlic if overused.
7. Which oil should I use?
Use a good quality olive oil with a fruity note. It helps the garlic roast evenly and adds flavor to the chickpeas.
8. How long should I roast the garlic?
Roast garlic until deeply golden and fragrant, about 35-40 minutes. It should smell nutty and smoky, not burnt.
9. When do I add the roasted garlic?
The best way is to squeeze out the soft garlic cloves into the chickpeas while they’re still warm, for full flavor integration.
10. My chickpeas are too salty, how do I fix it?
If the chickpeas are too salty, rinse them briefly with water and pat dry before roasting again. For too much salt, balance with a squeeze of lemon or a dash of vinegar.
This roasted garlic chickpeas recipe might seem simple, but it’s a little treasure for when you need a snack that’s both satisfying and deeply flavorful. The smoky garlic adds a cozy warmth, making every bite feel like a small indulgence. It’s perfect for those moments when you want something nourishing that also sparks a bit of joy.
Honestly, I keep coming back to this because it’s straightforward but turns humble ingredients into something memorable. Plus, the aroma of roasted garlic filling the kitchen is a treat in itself. It’s a reminder that sometimes, the best snacks come from just a few honest steps and a little patience.

Hi, I’m Lily Hayes, the cook, writer, and heart behind Loving This Process. This blog is built on a simple idea that food is not just about the final dish, but about everything that happens while you’re making it. The thinking, the tasting, the adjusting, the learning, and the quiet moments in between. Food has been a constant presence in my life, not as something flashy or perfect, but as something deeply grounding. Cooking has always felt like a process worth savoring, even when it’s messy, slow, or imperfect.


Leave a Reply