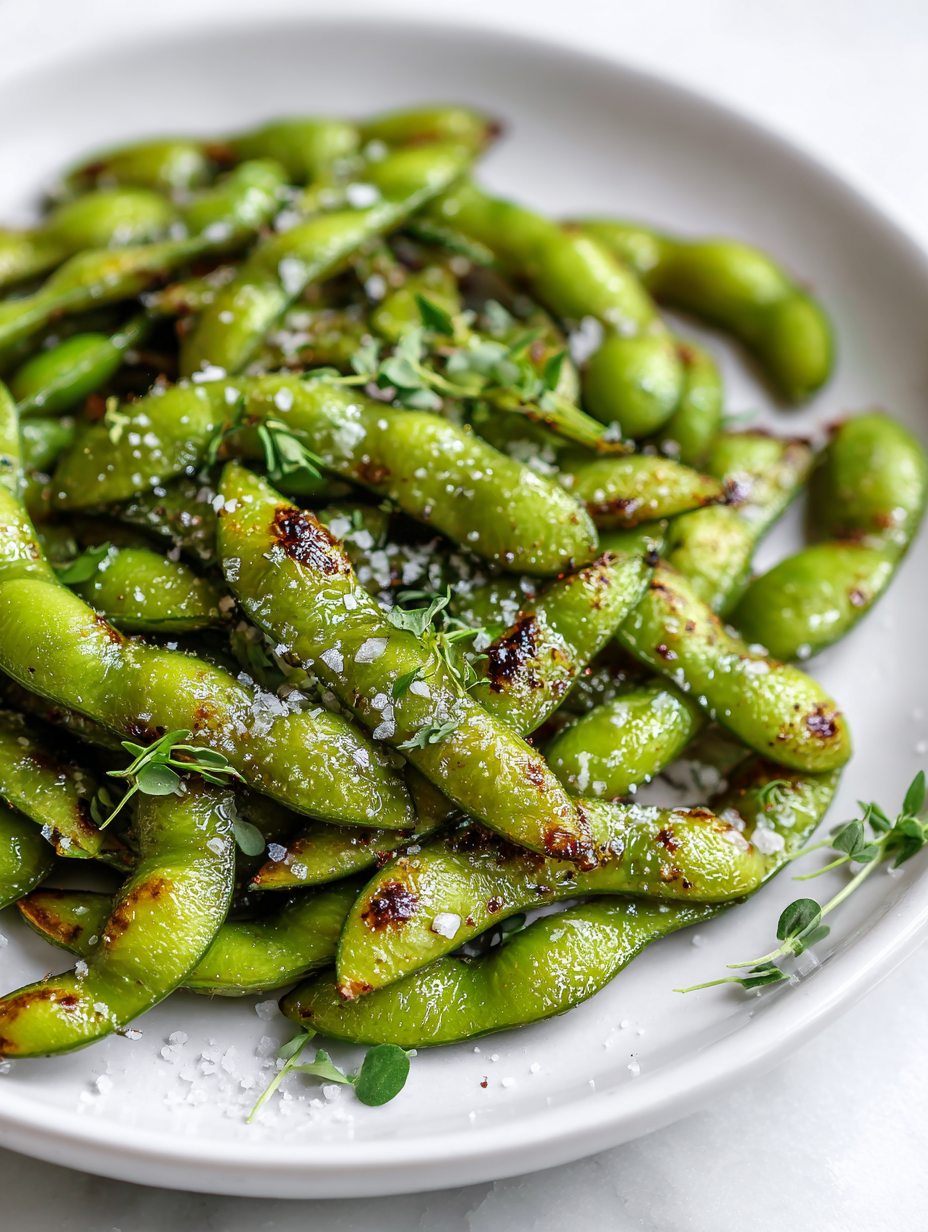
Roasting edamame is a small kitchen experiment that’s become a quiet obsession of mine. It’s astonishing how a simple change in heat can deepen their natural nuttiness, turning what’s usually a quick snack into something smoky and crave-worthy. I like to think of it as elevating a humble legume into a little roasted treasure.
There’s a messy thrill to watching those bright green beans transform in the oven—crackling, developing a golden hue, filling the kitchen with a warm, toasted aroma. It’s a process that feels like a tiny celebration of flavor, reminding me how straightforward ingredients can surprise with just a bit of heat and patience.
Focusing on how roasting enhances edamame’s natural nuttiness and transforms a simple snack into a crave-worthy, smoky treat.
The story behind this recipe
- Roasting edamame started as a kitchen experiment one rainy afternoon. I was craving something crunchy and smoky, but didn’t have chips or nuts around. The moment they hit the oven, I was hooked—those bright green beans turn into a crispy, savory snack that’s totally addictive.
- It’s funny how a simple tweak—just roasting instead of boiling—can totally change your view of a humble legume. I love that I can make a batch in minutes, and the smell alone makes the whole house feel warm and inviting.
- heading: ‘The story behind this recipe’
Key ingredients for perfect roasted edamame
- Dried edamame: I choose dried, shelled edamame for a more uniform roast; fresh ones can be a bit wetter, which might steam instead of roast, muting that smoky flavor.
- Olive oil: Just a light coating of good quality olive oil helps the salt stick and enhances the nutty aroma—don’t overdo it, or they’ll be greasy instead of crispy.
- Sea salt: I prefer flaky sea salt for that satisfying crunch and burst of briny flavor, but kosher salt works too if you crush it finely for an even sprinkle.
- Spices (optional): A pinch of smoked paprika or chili powder adds a smoky or spicy kick—start small, you can always add more after roasting for a personalized punch.
- Cooking spray: If you want an oil-free version, a quick spray of cooking oil spray helps everything crisp up without extra oil—just watch for uneven browning.
- Optional sugar: A tiny pinch of sugar can caramelize slightly, giving a sweet contrast to the smoky notes—use sparingly, it’s subtle but noticeable.
- Serving accompaniments: Tossed with lemon zest or a splash of soy sauce right after roasting elevates the flavor—think of it as a finishing touch that brightens or deepens.
Spotlight on key ingredients
Dried edamame:
- I choose dried, shelled edamame for a more uniform roast; fresh ones can be a bit wetter, which might steam instead of roast, muting that smoky flavor.
- Olive oil: Just a light coating of good quality olive oil helps the salt stick and enhances the nutty aroma—don’t overdo it, or they’ll be greasy instead of crispy.
- Sea salt: I prefer flaky sea salt for that satisfying crunch and burst of briny flavor, but kosher salt works too if you crush it finely for an even sprinkle.
Spices and finishing touches:
- Spices (optional): A pinch of smoked paprika or chili powder adds a smoky or spicy kick—start small, you can always add more after roasting for a personalized punch.
- Cooking spray: If you want an oil-free version, a quick spray of cooking oil spray helps everything crisp up without extra oil—just watch for uneven browning.
- Optional sugar: A tiny pinch of sugar can caramelize slightly, giving a sweet contrast to the smoky notes—use sparingly, it’s subtle but noticeable.
Notes for ingredient swaps
- Dried Edamame: I prefer dried, shelled edamame for a more even roast; fresh ones can be wetter, which might steam instead of roast, muting that smoky flavor.
- Olive Oil: Just a light coating of good quality olive oil helps the salt stick and boosts the nutty aroma—don’t overdo it, or they’ll be greasy instead of crispy.
- Sea Salt: I like flaky sea salt for that satisfying crunch and briny burst, but kosher salt works too if you crush it finely for an even sprinkle.
- Spices (optional): A pinch of smoked paprika or chili powder adds smoky or spicy notes—start small, you can always add more after roasting for a personalized kick.
- Cooking Spray: For an oil-free option, a quick spray of cooking oil spray helps everything crisp up without extra oil—just watch for uneven browning.
- Optional Sugar: A tiny pinch of sugar can caramelize slightly, giving a subtle sweet contrast—use sparingly, it’s a delicate hint.
- Serving Enhancements: Tossed with lemon zest or a splash of soy sauce right after roasting elevates the flavor—think of it as a bright or savory finish.
Equipment & Tools
- Baking sheet: To hold the edamame during roasting for even heat exposure.
- Parchment paper or silicone mat: To prevent sticking and facilitate cleanup.
- Mixing bowl: To toss edamame with oil and spices evenly.
- Spatula or tongs: To turn the edamame during roasting for even color.
Roasted Edamame Step-by-Step
- Preheat your oven to 200°C (390°F). Line a baking sheet with parchment paper or a silicone mat for easy cleanup.
- In a bowl, toss 2 cups of dried, shelled edamame with 1 tablespoon of olive oil until evenly coated. Add a pinch of sea salt and optional spices like smoked paprika or chili powder. Mix well.
- Spread the edamame in a single layer on the prepared baking sheet. Ensure they’re not crowded to promote even roasting.
- Roast in the oven for 15-20 minutes. Every 5 minutes, gently shake the pan to turn the edamame for even color and crunch.
- Watch for a deep golden hue and a nutty aroma. Edamame should crackle when stirred, and edges will look slightly blistered.
- Check one for doneness: it should be crispy, with a slight bounce when pressed, and smell smoky and toasted.
- If they’re not quite there, continue roasting in 2-minute bursts, checking frequently to avoid burning.
- Remove from oven and let rest for 5 minutes on the baking sheet. They will crisp further as they cool.
- Transfer to a bowl or plate. Toss with a squeeze of lemon or a splash of soy sauce if desired for extra flavor.
- Serve warm or at room temperature. Store leftovers in an airtight container for up to 3 days, re-crisp in the oven at 180°C (355°F) for a few minutes if needed.
Let the roasted edamame rest for 5 minutes to crisp up fully. Serve immediately or store in an airtight container. Toss with fresh lemon zest or soy sauce for added flavor just before serving.
How to Know It’s Done
- Color: Edamame should be deep golden and blistered.
- Aroma: Smoky, toasted smell indicating proper roasting.
- Texture: Crispy with a slight bounce when pressed, crackling sounds during stirring.
Oven-Roasted Edamame Snacks
Ingredients
Equipment
Method
- Preheat your oven to 200°C (390°F) and line a baking sheet with parchment paper or a silicone mat for easy cleanup.
- Transfer the dried, shelled edamame into a mixing bowl and drizzle with a tablespoon of olive oil. Toss well to ensure each bean is lightly coated.
- Add a pinch of sea salt and the smoked paprika (or other spices) to the bowl, then toss again to distribute evenly.
- Spread the seasoned edamame out in a single layer on the prepared baking sheet, making sure they’re not crowded for even roasting.
- Place the baking sheet in the oven and roast for 15-20 minutes. Every 5 minutes, open the oven and gently shake or stir the edamame with tongs to promote uniform browning.
- Watch for a deep golden color and listen for a crackling sound, indicating they’re crispy and toasted with a fragrant, nutty aroma.
- Once they reach your desired color and crunch, remove the baking sheet from the oven and let the edamame cool on the sheet for about 5 minutes — they will crisp further as they cool.
- Transfer the crispy edamame to a bowl, and if desired, toss with a squeeze of lemon or a splash of soy sauce for extra flavor right before serving.
- Serve immediately for maximum crunch or store in an airtight container for up to 3 days, reheating briefly in the oven if needed to revive crispiness.
Notes
Pro tips for perfect roasted edamame
- Bolded mini-head: Use a high oven temperature to promote rapid browning and crunch.
- Bolded mini-head: Shake the baking sheet every 5 minutes for even color and crispiness.
- Bolded mini-head: Watch for a deep golden hue; edges should look blistered and fragrant.
- Bolded mini-head: For extra crunch, let the edamame rest for 5 minutes after baking before serving.
- Bolded mini-head: Toss with spices immediately after roasting to lock in flavor and aroma.
- Bolded mini-head: Keep an eye on the oven to prevent burning; edamame can go from perfect to char in seconds.
- Bolded mini-head: For oil-free roasting, spray with a light mist of cooking spray and toss well.
Common roasting mistakes and how to fix them
- FORGOT to preheat the oven → Always preheat to ensure even roasting.
- DUMPED edamame in without stirring → Shake pan halfway for consistent crispness.
- OVER-TOASTED and burned edges → Remove when golden and fragrant, not dark and charred.
- MISSED resting time → Let them cool 5 minutes for maximum crunch and flavor.
Quick fixes and pantry swaps
- When burnt edges appear → Splash with a little lemon juice to brighten and mask bitterness.
- If edamame remains soft → Patch with extra time in the oven, crackle should increase noticeably.
- Dumped too many in at once → Shield with parchment to prevent uneven cooking and sogginess.
- Overcooked and dry → Rescue with a quick toss in a tiny bit of oil and a touch of sea salt.
- When lacking smoked paprika → Swap with chipotle powder for a smoky punch and vibrant shimmer.
Prep, store, and reheat tips
- Pre-roasting: You can dry and season the edamame a day ahead, storing it in the fridge to deepen flavors.
- Storage: Keep cooled roasted edamame in an airtight container at room temperature for up to 2 days; refrigerate for longer shelf life.
- Shelf life: For best crunch and flavor, consume within 3 days. The texture may soften over time, so re-crisp in the oven if needed.
- Reheating: Spread on a baking sheet and reheat at 180°C (355°F) for 3–5 minutes until crispy and fragrant, listening for that crackle.
Top questions about roasted edamame
1. How do I choose the best edamame?
Look for bright green, firm edamame with no signs of mold or excessive dryness. Freshness affects roasting quality.
2. Can I use frozen edamame instead of dried?
Yes, swapping in frozen edamame works. Just thaw and pat dry before roasting to avoid steaming.
3. How long should I roast edamame?
Roasting usually takes 15-20 minutes at 200°C (390°F). Keep an eye on color and aroma to prevent burning.
4. What does perfectly roasted edamame look and smell like?
Edamame should be crispy, golden, and smell toasted. They should crackle when stirred and feel firm but not hard.
5. How much oil and salt should I use?
A light coating of oil and a pinch of salt are key. Too much oil makes them greasy, too little can dry them out.
6. How do I store and reheat roasted edamame?
Store cooled roasted edamame in an airtight container for up to 3 days. Reheat in the oven for best crunch.
7. Can I add spices before roasting?
Feel free to add spices like smoked paprika or chili powder after roasting for a smoky or spicy flavor boost.
8. Should I add flavorings before or after roasting?
Yes, tossing with lemon zest or soy sauce after roasting brightens or deepens the flavor immediately.
9. How do I prevent uneven roasting?
Avoid overcrowding the pan to ensure even roasting. Shake the pan every 5 minutes for uniform color.
10. What if my edamame burns?
If edamame burns quickly, reduce oven temperature slightly or check more frequently. Use a timer for safety.
Roasted edamame is a reminder that simple ingredients can surprise you with depth and smoky warmth. It’s a snack I keep coming back to, especially when I want something quick and deeply satisfying. These little green beans have become my go-to for a casual, flavorful crunch.
In the end, it’s about the small moments—watching them crackle in the oven, sharing a handful with friends, or just enjoying that toasted aroma filling the kitchen. They’re humble, but they carry a little magic in each crispy bite, perfect for any season or mood.

Hi, I’m Lily Hayes, the cook, writer, and heart behind Loving This Process. This blog is built on a simple idea that food is not just about the final dish, but about everything that happens while you’re making it. The thinking, the tasting, the adjusting, the learning, and the quiet moments in between. Food has been a constant presence in my life, not as something flashy or perfect, but as something deeply grounding. Cooking has always felt like a process worth savoring, even when it’s messy, slow, or imperfect.


Leave a Reply