Potato fritters are one of those comfort foods that seem simple but can go terribly wrong if you’re not careful. I used to think crispy exterior and fluffy inside was a matter of luck, until I started paying attention to the little details—like how the starch is distributed or how long you let the grated potatoes rest. Mastering that balance turned these humble bites into something I crave on quiet weekends or when I need a quick snack that feels a little special.
What I love about making potato fritters is that they’re forgiving once you get the rhythm down. No fancy ingredients needed, just good potatoes, a pinch of salt, and a hot pan. But it’s those tiny tweaks—like how you squeeze out excess moisture or how you time the flip—that really make or break the crunch. This recipe is my honest take, based on years of trial, error, and a lot of crispy, golden bites.
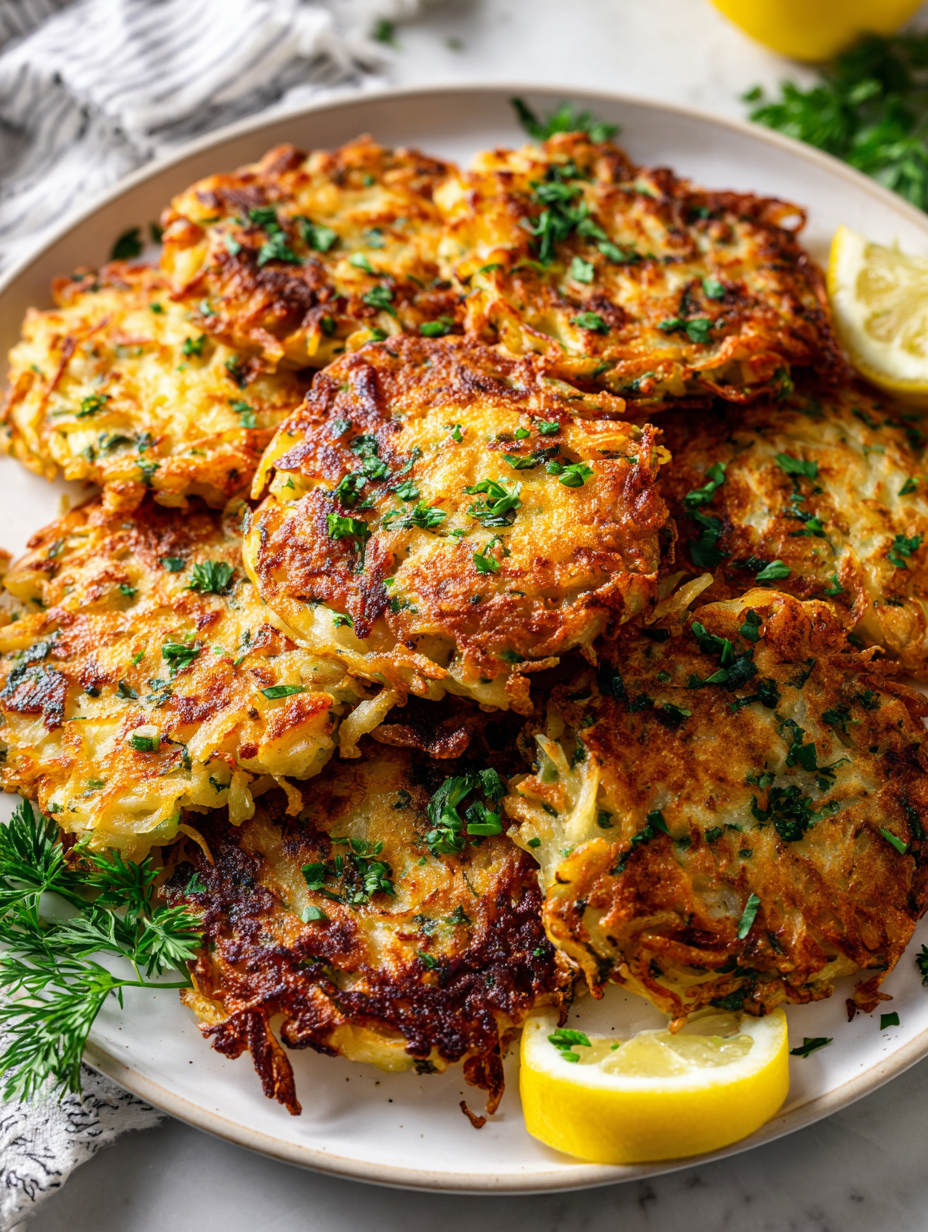
Focusing on the overlooked art of achieving the perfect crispy exterior without losing the tender, fluffy interior, using a simple stovetop method that anyone can master with a few insider tips.
Crispy Edges, Fluffy Heart
- Crispy edges make me feel like I’ve cracked some secret recipe, even if it’s just good technique.
- There’s a strange nostalgia in these fritters, reminding me of lazy weekend mornings at my grandma’s stove.
- I get oddly proud when I perfect that delicate balance between crunchy and tender—like a small victory every time.
- These fritters remind me that simple ingredients, treated right, can turn into something unexpectedly satisfying.
The story behind this recipe
- This recipe came about after a messy attempt at making crispy potato snacks for a family brunch. I wanted something that could be fried quickly but still had that perfect balance of crunch and softness inside. It’s funny how often I find inspiration in small kitchen disasters—like a batch that turned out soggy or burnt—that teach me what not to do. Over time, I started experimenting with different potato varieties and resting times, and eventually landed on this method that’s become my go-to.
- The real turning point was realizing how much moisture needs to be squeezed out to get that ideal crispness. It’s a simple fix but transformative—like giving the potatoes a little spa treatment before frying. Now, these fritters remind me of lazy weekends and spontaneous snack cravings, always satisfying but never taking themselves too seriously.
- heading:
Historical and Cultural Roots
- Potato fritters have roots in street food traditions across Eastern Europe and Asia, where they’re often enjoyed as quick, satisfying snacks.
- Historically, these fritters were a way to stretch humble potatoes into something crispy and filling, especially during times of scarcity.
- In some cultures, they’re linked to harvest festivals, celebrating the bounty of the season with simple, fried treats.
- The technique of squeezing out excess moisture before frying likely developed as a way to achieve that coveted crispy exterior, a trick passed down through generations.
Key Ingredients and Tips
- Russet potatoes: I like using these for their starchy texture that crisps up beautifully. Swap for Yukon Gold if you want a slightly waxier bite that still fries well.
- Onion: Finely grated onion adds a subtle sweetness and moisture. If you prefer a milder flavor, reduce the onion or omit it for a cleaner potato taste.
- Salt: Essential for bringing out the flavor and helping the potatoes release moisture. Adjust to taste, especially if using salted butter or other seasonings.
- Flour: I use all-purpose to help bind everything together. For a gluten-free version, try rice or chickpea flour, but expect a slightly different texture.
- Egg: Acts as a binder and gives the fritters structure. For vegan options, substitute with a flaxseed or chia seed slurry—just a teaspoon of ground seeds with water, thick and slightly nutty.
- Oil: Use a neutral oil with a high smoke point like canola or sunflower. For extra flavor, a splash of duck or bacon fat can add richness, but keep an eye on the crackle.
- Black pepper: Freshly ground adds a bite of heat. Or toss in some smoked paprika or cayenne for a smoky or spicy kick.
Spotlight on key ingredients
Potatoes:
- Russet potatoes: I love their starchy interior that crisps up to a perfect golden. Swap with Yukon Gold for a slightly creamier, less fluffy bite.
- Onion: Finely grated onion adds a subtle sweetness and moisture. If you prefer a milder flavor, reduce or omit for a cleaner potato taste.
Binders & Fat:
- All-purpose flour: Helps bind the mixture and crisp up. Rice or chickpea flour works for gluten-free, but expect a slightly denser texture.
- Egg: Acts as a binder. For vegan, try flaxseed or chia seed slurry—about 1 teaspoon ground seeds mixed with 3 teaspoons water.
- Oil: Neutral oils like canola or sunflower are best for frying; for richer flavor, a splash of bacon or duck fat adds depth, but monitor the heat carefully.
Notes for ingredient swaps
- Starchy potatoes: I prefer Russets for their fluffiness. Swap with Yukon Gold for a creamier, firmer bite.
- Onion: Finely grated yellow onion adds sweetness and moisture. Use shallots for a milder, subtler flavor or omit if you want pure potato taste.
- Salt: Essential for flavor and moisture. Adjust based on your seasoning preferences or if using salted butter or other salty ingredients.
- Flour: All-purpose works best. For gluten-free, try rice or chickpea flour, though the texture might be a bit denser.
- Egg: Binds everything together. Vegan? Use a flaxseed or chia seed slurry—about 1 teaspoon ground seeds mixed with 3 teaspoons water.
- Oil: Neutral oils like canola or sunflower are reliable. For a richer flavor, try duck fat or bacon fat, but watch for smoking or splatter.
- Herbs & spices: Fresh parsley, chives, or smoked paprika can elevate the flavor—add sparingly to suit your taste.
Equipment & Tools
- Grater: Shreds potatoes into fine strands for even cooking.
- Cheesecloth or towel: Squeezes out excess moisture for crispier fritters.
- Frying pan: Provides even heat for frying.
- Spatula: Turns fritters without breaking them.
- Paper towels: Absorbs excess oil and keeps fritters crisp.
Step-by-step guide to potato fritters
- Equipment & tools: Grater (for shredding potatoes), cheesecloth or clean towel (to squeeze out moisture), large mixing bowl, frying pan (preferably cast iron), spatula, paper towels (for draining), measuring spoons, knife, cutting board.
- Grate the potatoes: Use a box grater to shred the potatoes finely. About 2 cups of shredded potatoes. Set aside in a bowl.
- Drain excess water: Squeeze the grated potatoes in a cheesecloth or clean towel for at least 2 minutes until most moisture is gone. Excess moisture makes fritters soggy.
- Mix ingredients: In the large bowl, combine the drained potatoes, 1 small finely grated onion, 1 teaspoon salt, 2 tablespoons flour, and 1 beaten egg. Stir until well incorporated.
- Heat oil: Place your frying pan on medium-high heat (~190°C/375°F). Pour enough oil to cover the bottom generously. Wait until shimmering and crackling starts—test with a small pinch of batter.
- Form fritters: Using a tablespoon or your hands, shape the mixture into small, flat patties about 1/2 inch thick. Carefully slide them into the hot oil, spacing apart. Be gentle—hot oil can splash.
- Fry until golden: Cook for 3-4 minutes per side, flipping once, until the edges are crispy and deep golden. Adjust heat if the fritters brown too quickly or burn.
- Drain: Remove with a slotted spatula and place on paper towels to drain excess oil. Rest for 2 minutes to finish crisping.
- Serve hot: Plate immediately, with a squeeze of lemon or a dollop of sour cream if desired. The fritters should be crispy on the outside, tender inside.
- Checkpoints: The fritters are golden and crispy, smell toasted and savory, and feel firm but tender when gently pressed. No excess oil should pool beneath, and they shouldn’t be soggy.
Let the fritters rest for just a minute to set their crust. Serve immediately while hot and crispy, garnished with herbs or lemon if you like. Plate on a warm dish to keep the crunch.
How to Know It’s Done
- Golden, crispy exterior with a slight jiggle inside.
- Aromatic, toasted potato smell without burnt notes.
- No oil pooling on plate, fritters remain firm but tender.
Crispy Potato Fritters
Ingredients
Equipment
Method
- Start by shredding the peeled potatoes using a box grater, then place the shredded potatoes into a large bowl.
- Use a clean towel or cheesecloth to squeeze out as much excess moisture from the shredded potatoes as possible. This helps ensure the fritters turn crispy and not soggy.
- Add the finely grated onion, salt, and freshly ground black pepper to the bowl of drained potatoes.
- Stir in the flour and beaten egg until everything is evenly combined, creating a sticky mixture that holds together well.
- Heat the oil in a frying pan over medium-high heat until shimmering and hot—test with a small drop of batter; it should bubble immediately.
- Using a tablespoon, scoop out a portion of the mixture and gently shape it into a flat patty about half an inch thick. Carefully place it into the hot oil, making sure not to overcrowd the pan.
- Fry the fritters for about 3-4 minutes on each side, or until they are deep golden and crispy around the edges, listening for a gentle crackle as they cook.
- Use a spatula to flip the fritters carefully, ensuring they keep their shape and develop an even crust.
- Once golden and crispy, transfer the fritters to a plate lined with paper towels to absorb excess oil. Rest for a minute to finish crisping.
- Serve the fritters hot, garnished with herbs or a squeeze of lemon if desired, and enjoy their crispy, fluffy texture.
Pro tips for crispy potato fritters
- Bolded mini-head: Keep the grated potatoes cold before squeezing out moisture to prevent them from turning mushy.
- Bolded mini-head: Use a gentle hand when forming patties—pressing too hard can make them dense instead of tender.
- Bolded mini-head: Test the oil temperature with a tiny batter piece—look for bubbling and a shimmer, not smoking.
- Bolded mini-head: Don’t overcrowd the pan; frying in batches ensures even crispness and prevents temperature drops.
- Bolded mini-head: Flip the fritters only once they’re golden and crispy around the edges—patience keeps them intact.
- Bolded mini-head: Rest the cooked fritters on a wire rack for a minute—this keeps their crust crispy instead of soggy.
- Bolded mini-head: For extra crunch, finish with a light sprinkle of coarse sea salt right after frying—sensory contrast is key.
Common mistakes and how to fix them
- FORGOT to squeeze out moisture → Squeeze potatoes thoroughly to prevent sogginess.
- DUMPED the batter in oil → Carefully form and gently slide fritters into hot oil.
- OVER-TORCHED the first side → Adjust heat as needed; fry until golden, not burnt.
- UNDERESTIMATED resting time → Let fritters rest 1-2 minutes for crispness to set.
Quick fixes and pantry swaps
- When fritters are greasy, splash a little vinegar into the oil to cut through excess fat.
- If batter is too wet, dump in a pinch more flour and gently fold.
- Splash a few drops of water on hot oil if crackling sound is faint to revive the shimmer.
- Patch soggy spots by pressing them gently with a spatula during frying for even crispness.
- Shield burnt edges with a paper towel or lower heat, and rescue with fresh oil if needed.
Prep, store, and reheat tips
- Prep the grated potatoes and squeeze out excess moisture a day in advance; store in an airtight container in the fridge for up to 24 hours. They’ll stay fresh and firm, ready to fry.
- You can assemble the fritter mixture ahead of time, cover, and keep in the fridge for up to 4 hours. The flavors meld and the mixture remains workable, but avoid letting it sit too long to prevent browning.
- Cooked fritters are best enjoyed fresh, but can be stored in an airtight container in the fridge for up to 2 days. Reheat in a hot skillet for 2-3 minutes until crispy, with a gentle shimmer of oil and a satisfying crackle.
- Reheating will soften the fritters slightly; for best texture, reheat on the stovetop rather than microwave. Expect a gentle aroma of fried potato and a crispy crunch with each bite.
Top questions about potato fritters
1. Can I use different potatoes?
Use starchy potatoes like Russets for crispy outsides and fluffy insides. Waxy potatoes can make them denser and less crisp.
2. How do I prevent soggy fritters?
The key is squeezing out as much moisture as possible after grating. Too much water makes fritters soggy and floppy.
3. What’s the best oil temperature?
Fry in medium-high heat (around 190°C/375°F). If the oil smokes or the fritters brown too quickly, lower the heat slightly.
4. Why do my fritters fall apart?
If the fritters fall apart when flipping, let them fry a minute longer until they’re more set and crispy on the bottom.
5. How do I drain excess oil?
Use a slotted spatula to lift them out. Rest on paper towels to absorb excess oil and keep them crispy.
6. Can I prep in advance?
You can prepare the grated potatoes and squeeze out moisture a day ahead. Keep in an airtight container in the fridge.
7. Can I make these vegan?
For vegan fritters, replace egg with a flaxseed or chia seed slurry—about 1 teaspoon ground seeds mixed with 3 teaspoons water.
8. How to reheat without losing crunch?
Reheat in a hot skillet for 2-3 minutes until crispy. Avoid microwaving, which makes them soft and limp.
9. Why are my fritters greasy?
If your oil is too cold, the fritters will absorb more fat and be greasy. Make sure it shimmers before adding batter.
10. How do I season the batter?
Adjust seasoning by tasting the batter before frying. Add more salt or spices if needed for a balanced flavor.
These potato fritters are a reminder that simple techniques can elevate humble ingredients into something memorable. When you get that perfect crunch and tender inside, it’s a small, satisfying victory. They’re a go-to for spontaneous snacks or lazy weekend mornings, especially when you crave something crispy and warm.
In a world of quick bites and easy comfort food, these fritters keep me grounded—reminding me that a little patience and attention can turn everyday potatoes into a special treat. Enjoy the process, listen for that crackle, and let the aroma of toasted potatoes fill your kitchen. Sometimes, that’s all it takes to make a simple meal feel just right.

Hi, I’m Lily Hayes, the cook, writer, and heart behind Loving This Process. This blog is built on a simple idea that food is not just about the final dish, but about everything that happens while you’re making it. The thinking, the tasting, the adjusting, the learning, and the quiet moments in between. Food has been a constant presence in my life, not as something flashy or perfect, but as something deeply grounding. Cooking has always felt like a process worth savoring, even when it’s messy, slow, or imperfect.
Leave a Reply