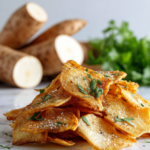
There’s something about the crispy, golden edges of a paneer cutlet that instantly transports me back to childhood snack times. It’s a comforting bite, simple yet satisfying, that bridges the gap between nostalgic homemade flavors and quick, weeknight fixes. I love how a handful of humble ingredients can come together into something so crave-worthy, especially when you’re short on time but still crave that warm, cheesy crunch.
Making these cutlets feels like a small act of kindness—an easy recipe that’s perfect for busy evenings or unexpected guests. The aroma of toasted spices and melting paneer in the pan is enough to lift anyone’s mood. Honestly, I find myself reaching for these more often than I’d admit, especially when I want a little reminder of simple pleasures in a hectic week.
Focusing on how paneer cutlets can be a comforting, nostalgic snack that bridges homemade tradition with quick, satisfying bites for busy weeknights.
Nostalgic bites with a twist
- These cutlets remind me of lazy Sunday afternoons at my grandma’s house, where the smell of spices filled the air.
- I always feel a rush of pride when I fry these and see that perfect golden crust—like a little culinary win.
- There’s a nostalgic joy in biting into a crispy edge that’s been seasoned just right, bringing back childhood memories.
- Sometimes, making these is chaos—until I get the seasoning right and the paneer just melts in your mouth, then it’s worth every second.
Nostalgic bites with a twist
I first stumbled upon this recipe during a busy week when I needed something quick yet comforting. A friend mentioned how her grandmother’s paneer cutlets were her go-to snack for chilly evenings, and I couldn’t get the idea out of my mind. It’s funny how such simple ingredients can evoke a sense of warmth and nostalgia, reminding me of lazy afternoons and shared stories over fried snacks. Now, it’s become a little ritual of mine to make these whenever I need a quick dose of familiarity and comfort.
Trivia and Historical Insights
- Paneer cutlets have roots in North Indian snack traditions, blending the rich dairy of paneer with crispy coatings.
- This recipe likely evolved as a quick street food, perfected over decades by vendors looking for satisfying, portable bites.
- In some regions, these cutlets are a festive treat, served during celebrations and family gatherings for their hearty, comforting appeal.
Ingredient breakdown: key components
- Paneer: I prefer fresh, soft paneer that’s slightly crumbly but melts well when fried—look for a mild, milky aroma. Swap with firm tofu if you want a vegan version, but expect a different texture and milder flavor.
- Potatoes: I use boiled, mashed potatoes for binding—choose starchy ones for a fluffier cutlet. If you only have waxy potatoes, add a little more flour to hold everything together.
- Spices: I keep cumin, coriander, and a pinch of garam masala handy—these give the cutlets their warm, aromatic punch. Adjust according to your heat tolerance or flavor preference.
- Breadcrumbs: For that crunchy exterior, I like panko for extra crispness. If you only have regular breadcrumbs, double the amount slightly to compensate for less crunch.
- Herbs: Fresh cilantro or mint brightens up the flavor—use them generously for a fresh, herbal note. Dried herbs can work in a pinch but won’t have the same vibrant impact.
- Oil: I prefer neutral oil like vegetable or canola for frying—hot enough at 180°C (350°F), till the cutlets sizzle loudly when submerged. If the oil smokes, lower the heat slightly.
- Optional add-ins: Finely chopped green chilies or ginger add a kick—use sparingly if you prefer milder bites. Freshness in these ingredients really wakes up the flavor.
Spotlight on key ingredients
Paneer:
- I prefer fresh, soft paneer with a mild aroma. It should crumb easily but melt when fried, creating that gooey center.
- Watch for a slightly crumbly texture that holds shape but softens beautifully. Sub with firm tofu for a vegan twist, but expect a different bite.
Spices:
- I use cumin, coriander, and garam masala—these give a warm, aromatic punch. Adjust for more heat or milder flavor based on your taste.
- Toast them lightly in oil first to unlock deeper aroma and reduce raw spice taste, especially if using whole seeds.
Notes for ingredient swaps
- Dairy-Free: Swap paneer for firm tofu. It’ll be softer and milder, but still holds together well during frying.
- Gluten-Free: Use gluten-free breadcrumbs or crushed cornflakes for a crispy exterior without wheat.
- Low-Sodium: Omit or reduce salt, and choose unsalted butter or oil to control saltiness without sacrificing flavor.
- Vegan: Replace paneer with seasoned, pan-fried tempeh or jackfruit for a plant-based alternative that still offers satisfying bite.
- Spice Adjustments: Skip or reduce chili or garam masala for milder cutlets, or boost with extra cayenne for heat lovers.
- Binding Agents: If mixture feels loose, add a tablespoon of chickpea flour or rice flour to help hold shape during frying.
- Herb Variations: Use chopped spinach or kale instead of fresh cilantro for a different herbal note and added nutrients.
Equipment & Tools
- Mixing bowl: Combine ingredients thoroughly.
- Grater: Optional, for grated paneer if preferred.
- Frying pan: Cook and crisp the cutlets.
- Slotted spoon: Turn and remove cutlets from oil.
Step-by-step guide to paneer cutlets
- Equipment & Tools: Gather a mixing bowl (for shaping), a grater (if you prefer grated paneer), a frying pan (for cooking), and a slotted spoon (for turning).
- Crumble the paneer: Break it into small pieces with your fingers or mash lightly. Aim for a crumbly but cohesive texture, about 2 minutes.
- Mix ingredients: Add mashed potatoes, spices, chopped herbs, and a pinch of salt to the paneer. Combine thoroughly, about 3 minutes, until the mixture holds together.
- Shape cutlets: Divide the mixture into 8 equal portions. Flatten each into a patty about 1.5 cm thick, roughly 8 cm diameter. Use a little water on your hands if sticking.
- Prepare for frying: Place breadcrumbs on a plate. Gently coat each cutlet in breadcrumbs, pressing lightly so they stick well. Set aside.
- Heat oil: Pour enough neutral oil into the pan to submerge the cutlets about halfway. Heat on medium-high until it shimmers and reaches 180°C (350°F).
- Fry cutlets: Carefully place cutlets into hot oil, about 2-3 at a time. Fry for 3-4 minutes per side, until golden brown and crispy. Adjust heat if they brown too quickly.
- a. Flipping: Use a slotted spoon or tongs to turn them gently. Watch for a crackling sound and a rich aroma of spices and frying paneer.
- b. Fix if sticking: If they stick, gently nudge with a spatula or reduce heat slightly. If oil smokes, remove from heat briefly and lower temperature.
- Drain and rest: Remove cutlets with a slotted spoon, drain on paper towels for 1 minute. Let sit briefly to firm up before serving.
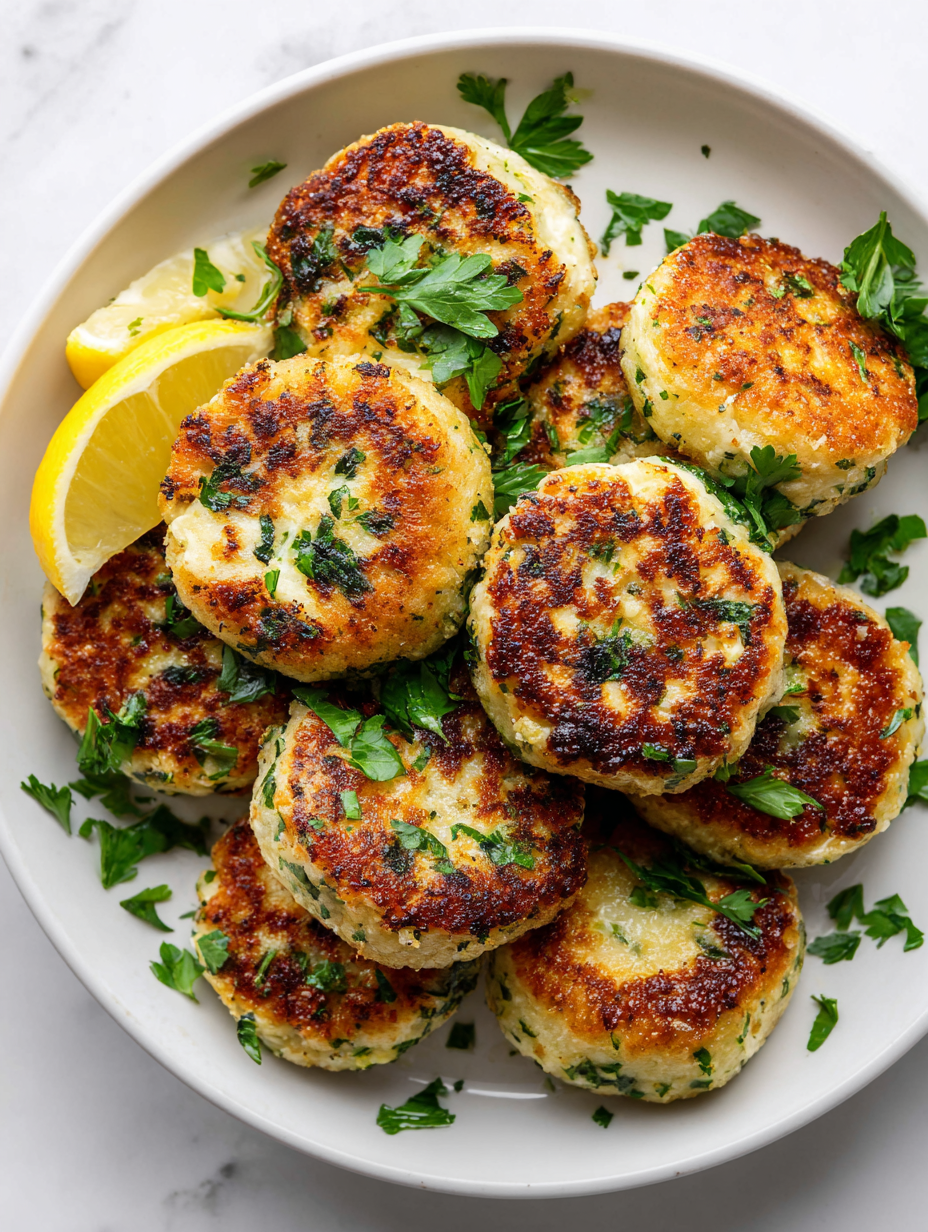
- Resting & Finishing: Serve hot with a squeeze of lemon or a side of tangy chutney. They’re best eaten warm—crispy on the outside, soft inside.
Let the cutlets rest on paper towels for a minute to drain excess oil. Serve immediately while crispy and warm, garnished with herbs or lemon if desired.
How to Know It’s Done
- Color: Golden and crispy exterior, no raw patches.
- Smell: Aromatic spices and fried paneer should be evident, inviting and warm.
- Texture: Firm but tender, with a slight give when pressed, not mushy.
Paneer Cutlets
Ingredients
Equipment
Method
- Crumble the paneer into a large mixing bowl, breaking it into small, crumbly pieces. If using, toast cumin seeds in a dry pan until fragrant, then grind or crush them and add to the bowl.
- Add the mashed potatoes, coriander powder, garam masala, chopped cilantro, salt, and two tablespoons of breadcrumbs to the bowl. Mix everything thoroughly until the mixture becomes cohesive and easy to shape, about 3 minutes.
- Divide the mixture into 8 equal portions. Lightly wet your hands and shape each portion into a flat round patty about 1.5 cm thick and roughly 8 cm in diameter.
- Place some breadcrumbs on a plate and gently press each patty into the breadcrumbs, coating both sides evenly. Set the coated cutlets aside on a plate.
- Heat enough oil in a frying pan over medium-high heat until shimmering and hot, around 180°C (350°F). You can test by dropping a small piece of bread or a breadcrumb—if it sizzles and bubbles immediately, the oil is ready.
- Carefully place the cutlets into the hot oil, working in batches if necessary. Fry for about 3-4 minutes on each side, until they turn a beautiful golden brown and crispy exterior. Listen for a crackling sound and smell the warm spices.
- Gently turn the cutlets with a slotted spoon or tongs, ensuring an even, crispy crust develops. Fry until both sides are golden and the cutlets feel firm to the touch.
- Remove the fried cutlets from the oil and place them on paper towels to drain excess oil. Let them rest for about a minute to firm up and maintain their crunch.
- Serve the hot paneer cutlets immediately with a squeeze of lemon or a side of chutney. The exterior should be crispy and golden, with a soft, cheesy interior that melts in your mouth.
Pro tips for perfect paneer cutlets
- Bolded mini-head: Use medium heat for frying to prevent burning the breadcrumbs while ensuring a crispy crust.
- Bolded mini-head: Gently press the cutlets into breadcrumbs to help them adhere better and stay intact during frying.
- Bolded mini-head: For extra crispness, double coat the cutlets in breadcrumbs—dip in egg wash first if needed.
- Bolded mini-head: Keep an eye on the oil’s temperature—if it smokes, reduce heat immediately to avoid burnt edges.
- Bolded mini-head: Rest the fried cutlets on paper towels briefly to absorb excess oil and maintain crunch.
- Bolded mini-head: Serve hot right after frying for the best texture—letting them sit cools the crispness too fast.
Common mistakes and how to fix them
- FORGOT to preheat oil → Ensure oil is hot (180°C/350°F) before frying.
- DUMPED the mixture too early → Rest mixture for 10 minutes to help bind ingredients.
- OVER-TORCHED the cutlets → Keep heat medium to prevent burning and achieve even color.
- MISSED flipping at the right time → Flip when edges are golden and crispy, usually after 3 minutes.
Quick fixes and pantry swaps
- When oil splatters, splash cold water nearby to quickly calm the crackle and prevent burns.
- If cutlets are sticking, gently nudge with a spatula and lower the heat slightly.
- Splash a little lemon juice or vinegar if the oil smells burnt or off-smelling.
- Patch a soggy cutlet by placing it in hot oil for a quick crisp-up—just 30 seconds per side.
- Shield a burnt batch by transferring to a fresh, hot pan and start frying new cutlets with pantry swap spices.
Prep, store, and reheat tips
- Prepare the mixture up to a day in advance; keep refrigerated to retain freshness and prevent spoilage.
- Cooked cutlets can be stored in an airtight container in the fridge for up to 2 days, maintaining crispness if reheated properly.
- Reheat in a hot skillet or oven (around 180°C/350°F) until crispy; avoid microwave to preserve crunch and avoid sogginess.
- For longer storage, freeze uncooked or cooked cutlets for up to 1 month; thaw thoroughly before reheating for best texture.
- The flavors deepen slightly after refrigeration, so expect a richer spice aroma when reheated, with a slight loss in initial crispness.
Top questions about paneer cutlets
1. Can I use tofu instead of paneer?
Use fresh, soft paneer for a gooey center and better flavor. Substitute with firm tofu for a vegan version, but expect a different texture.
2. Should I drain or squeeze the paneer first?
Yes, make sure to squeeze out excess moisture from the paneer to avoid soggy cutlets. Press it lightly before crumbling.
3. How do I know when the cutlets are perfectly fried?
Fry the cutlets in hot oil (around 180°C or 350°F) until golden and crispy, usually 3-4 minutes per side. They should crackle loudly when ready.
4. My cutlets are sticking to the pan, what do I do?
If they stick to the pan, reduce the heat slightly and gently nudge with a spatula. Using enough hot oil helps prevent sticking.
5. Can I make the mixture in advance?
You can prepare the mixture a day ahead, tightly cover, and refrigerate. Fry just before serving for the best crunch and flavor.
6. How do I reheat leftover paneer cutlets?
To reheat, place cooked cutlets on a baking sheet in a preheated oven at 180°C (350°F) for about 10 minutes until crispy. Avoid microwaving if you want to keep the crunch.
7. Can I customize the spices?
Adjust spices to your taste—add more chili for heat or herbs for freshness. The flavor deepens after resting, so don’t worry if it’s a bit milder initially.
8. What kind of breadcrumbs should I use?
Use panko breadcrumbs for extra crispness. If you only have regular breadcrumbs, double the amount slightly to compensate for less crunch.
9. Any tips for frying without sogginess?
Ensure the oil is hot before frying and don’t overcrowd the pan. Fry in batches if needed to keep the temperature steady.
10. How should I serve these cutlets?
Serve hot with a squeeze of lemon or tangy chutney. They’re crispy outside and soft inside, with a warm, cheesy aroma that’s comforting.
Frying these paneer cutlets fills my kitchen with a warm, cheesy aroma that’s hard to resist. They’re perfect for those quick, satisfying bites that somehow still carry a sense of home and tradition. Sometimes, I find myself making a double batch just to have leftovers for the next day’s snack or lunch. They’re one of those recipes that sneak into your regular rotation without fussing too much, yet still feel special.
In the end, it’s the simple pleasure of crispy, golden edges and gooey paneer inside that keeps me coming back. Whether it’s a busy weeknight or a casual get-together, these cutlets hold their charm and comfort, making every bite a small, honest joy. And honestly, that’s what good food should do—bring a little warmth and familiarity to an ordinary day.

Hi, I’m Lily Hayes, the cook, writer, and heart behind Loving This Process. This blog is built on a simple idea that food is not just about the final dish, but about everything that happens while you’re making it. The thinking, the tasting, the adjusting, the learning, and the quiet moments in between. Food has been a constant presence in my life, not as something flashy or perfect, but as something deeply grounding. Cooking has always felt like a process worth savoring, even when it’s messy, slow, or imperfect.
Leave a Reply