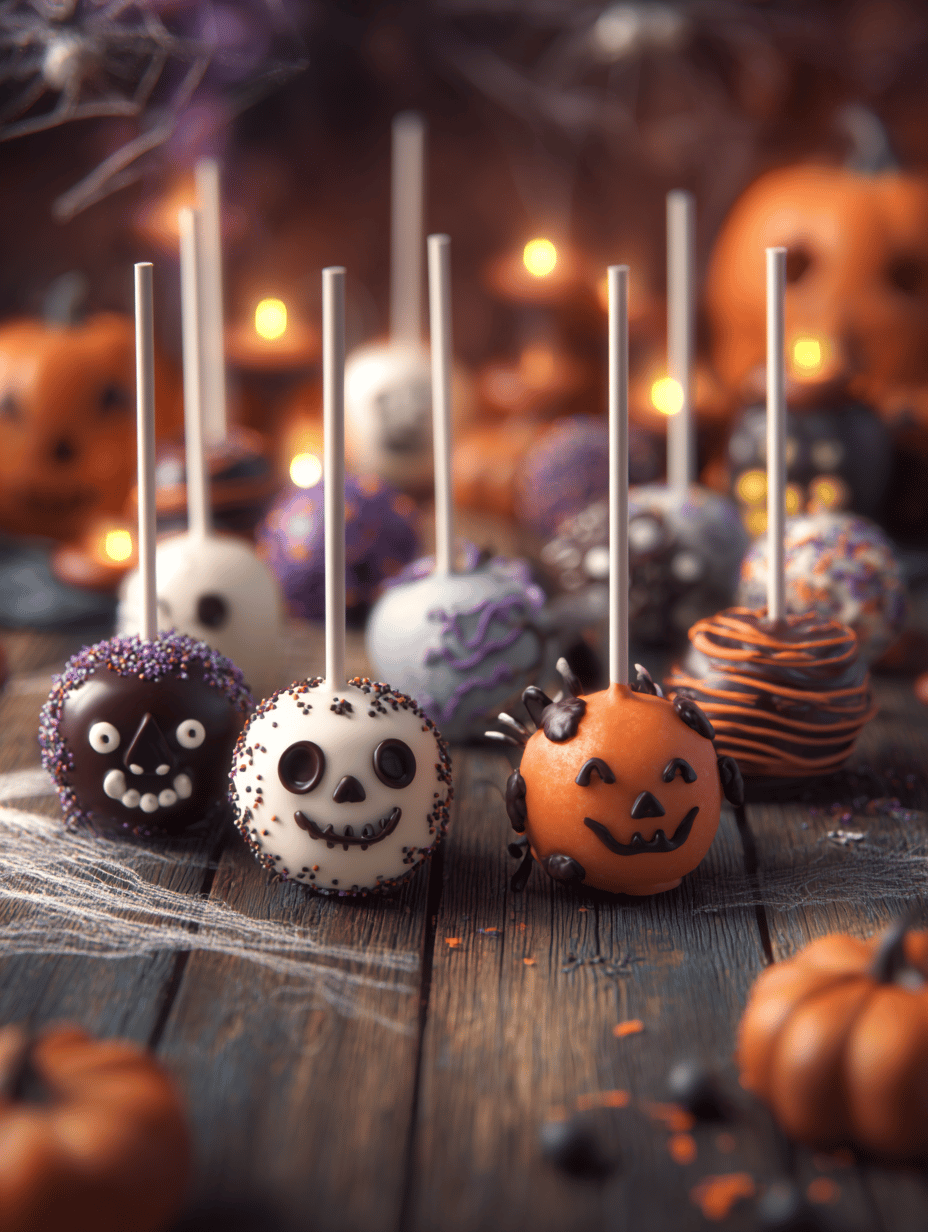
Every year, I get a little obsessed with making Halloween treats that aren’t just spooky but also fun to craft. Cake pops are my go-to because they’re portable, customizable, and cuter than a pumpkin in a sweater. They turn a simple cake into tiny edible art, perfect for parties or just a quick Halloween fix.
Why I Keep Reaching for This Halloween Favorite
Making these cake pops is a messy, joyful chaos that reminds me of childhood Halloweens. Each year, I tweak the decorations, trying to outdo myself. They’re simple, fun, and a little bit silly—perfect for breaking up the seasonal rush.
Inside the Kitchen: Key Ingredients & Their Secrets
- Dark chocolate: My go-to for a rich, glossy finish. Swap with vegan or milk chocolate if you prefer milder sweetness.: Provides the coating that makes these pops shine and crunch.
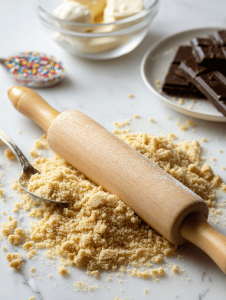
- Biscuit cookies: I use digestives for a buttery crumb, but graham crackers work too.: The base that turns into a sweet, crumbly dough.
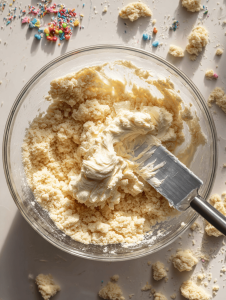
- Cream cheese: Adds a tangy, creamy texture. Can substitute with mascarpone for extra richness.: Helps bind the crumbs into a firm, moldable dough.
- Sprinkles and edible eyes: For that Halloween vibe. Use colored sugar or small candies if you want more variety.: Decorative touches that make each pop uniquely spooky.
- Lollipop sticks: Wood or plastic, whichever you have. Wooden sticks are more sturdy.: The handle that turns your treat into a portable snack.
Tools of the Trade for Creepy-Cute Cake Pops
- Double boiler or heatproof bowl over saucepan: Melts chocolate gently without burning.
- Baking sheet lined with parchment paper: Holds the cake balls while setting.
- Lollipop sticks: Forms the handle of your cake pop.
- Decorating tools and edible decorations: Adds spooky details like eyes or sprinkles.
Step-by-Step Guide to Spook-tacular Cake Pops
Step 1: Start by melting 200g of dark chocolate in a heatproof bowl over simmering water, stirring until smooth.
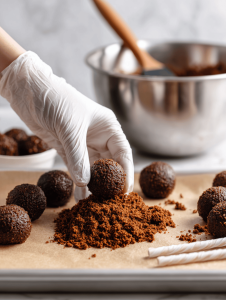
Step 2: Crush 150g of biscuit cookies into fine crumbs; mix with 100g cream cheese until you get a dough-like consistency.
Step 3: Shape the mixture into small, rounded balls—about the size of a golf ball—and place them on a baking sheet lined with parchment.
Step 4: Chill the balls in the fridge for at least 30 minutes until firm.
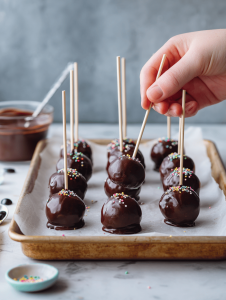
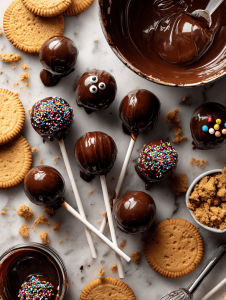
Step 5: Insert a lollipop stick into each ball, then dip into the melted chocolate, turning to coat evenly.
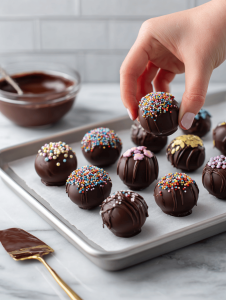
Step 6: Set the coated pops back on the parchment and decorate with sprinkles, edible eyes, or colored melting wafers.
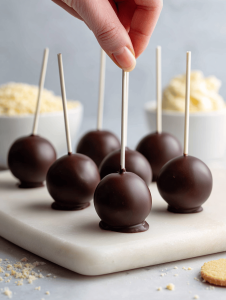
Step 7: Allow the chocolate to set completely, about 1 hour at room temperature or 30 minutes in the fridge.
Cooking Checks & Tips to Perfect Your Cake Pops
- Chocolate coating should be smooth and shiny, not dull or streaky.
- The cake balls should be firm enough to hold the stick without cracking or collapsing.
- Decorations should sit flat and not slide off, indicating the chocolate has properly set.
Common Mistakes and How to Fix Them
- Chocolate coating streaky and dull.? DUMPED the chocolate before it cooled, causing streaks. Fix: Re-melt and temper for smoothness.
- Chocolate is too thick to dip.? Over-melted the chocolate, it seized and thickened. Fix: Add a little vegetable oil to loosen.
- Cake balls fall apart or crack.? Cake mixture was too dry, crumbling when shaped. Fix: Add more cream cheese or a splash of milk.
- Decorations slipping off or melting.? Decorations slide off before chocolate sets. Fix: Let the coating cool slightly so it’s not too hot.
Halloween Cake Pops
Ingredients
Equipment
Method
- Begin by melting the dark chocolate in a double boiler or a heatproof bowl set over simmering water, stirring gently until smooth and glossy. This will create a perfect coating for your cake pops.
- Crush the biscuits into fine crumbs using a rolling pin or food processor, until they resemble sand. Transfer the crumbs to a mixing bowl.
- Add the softened cream cheese to the biscuit crumbs and mix thoroughly with a spoon or spatula until the mixture holds together like dough.
- Shape the mixture into small, round balls about the size of a golf ball, and place each onto a parchment-lined baking sheet. This helps them set and keeps them from sticking.
- Chill the cake balls in the refrigerator for at least 30 minutes until they are firm and easier to handle.
- Once chilled, insert a lollipop stick into the center of each cake ball, pressing gently to secure it.
- Dip each stick-embedded cake ball into the melted dark chocolate, turning to coat evenly. Gently tap off any excess chocolate.
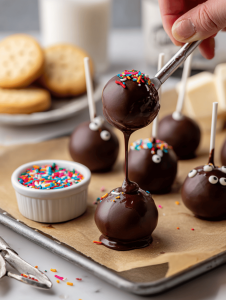
- Place the coated cake pops back on the parchment-lined sheet and decorate with sprinkles and edible eyes while the chocolate is still wet.

- Allow the chocolate coating to set completely at room temperature, or speed up the process by placing the tray in the refrigerator for about 30 minutes.
- Once the chocolate is firm and shiny, your spooky Halloween cake pops are ready to serve! Enjoy these adorable, crunchy treats that are perfect for any festive occasion.
Notes

Hi, I’m Lily Hayes, the cook, writer, and heart behind Loving This Process. This blog is built on a simple idea that food is not just about the final dish, but about everything that happens while you’re making it. The thinking, the tasting, the adjusting, the learning, and the quiet moments in between. Food has been a constant presence in my life, not as something flashy or perfect, but as something deeply grounding. Cooking has always felt like a process worth savoring, even when it’s messy, slow, or imperfect.


Leave a Reply