Making your own baked vegetable chips is a small act of rebellion against the overly processed snack aisle. There’s something satisfying about choosing fresh carrots, zucchini, or sweet potatoes and turning them into crispy bites that actually taste like vegetables, not just salt and oil. It’s a simple process, but the magic is in the slicing—thin enough to crisp up without burning, and seasoned just enough to highlight their natural sweetness or earthiness.
These chips aren’t just a healthy alternative; they’re a way to really appreciate the texture and flavor of everyday vegetables. I love experimenting with different seasonings—paprika, cumin, or even a sprinkle of seaweed flakes—to keep it interesting. Plus, baking keeps the kitchen quiet and the cleanup minimal, making it one of those recipes you can whip up even on a busy weeknight. It’s honestly more about the process than the perfection, and the crunch that comes out of the oven is always worth the effort.
Focusing on how homemade baked vegetable chips can be a satisfying, crunchy snack that replaces store-bought versions, emphasizing the process of selecting, slicing, and seasoning vegetables for maximum flavor and crispness.
The story behind this recipe
- This recipe was born out of a lazy Sunday craving for something crispy but not greasy. I was digging through the fridge, looking for ways to use up leftover vegetables, and suddenly remembered how much I loved those thin, oven-baked chips from childhood. But I wanted to make my own, with a little twist—more flavor, less fuss. The kitchen filled with the warm, toasty smell of roasting veggies, and I knew I’d stumbled on something worth sharing.
- Every time I make these, I think back to my grandma’s garden, the rows of carrots and zucchinis she’d harvest in the early morning. Those simple, honest flavors remind me that good snacks don’t have to come from a bag. It’s a small act of reclaiming freshness, crunch, and a bit of nostalgia, all in one bite.
Ingredient breakdown: key components
- Sweet potatoes: I love their natural sweetness and vibrant color, but they can burn fast—be sure to keep an eye on them in the oven.
- Zucchini: Thin slices are key; they release a lot of moisture, so pat them dry thoroughly to get that crisp crunch.
- Carrots: Their earthy flavor adds a nice sweetness, but slicing evenly helps them cook uniformly—use a mandoline if you have one.
- Olive oil: I use just a light brushing—too much oil makes the chips greasy and dulls the crunch, especially with delicate veggies.
- Sea salt: A sprinkle at the end enhances flavor, but do it sparingly—over-salting can overshadow the veggie’s natural taste.
- Seasonings: Paprika or cumin are my favorites, but experiment with herbs or a dash of smoked paprika for deeper flavor.
- Optional extras: A pinch of nutritional yeast adds umami, but don’t go overboard—it can mask the veggie flavor if too much.
Spotlight on key ingredients
Sweet potatoes:
- I love their natural sweetness and vibrant color, but they can burn fast—be sure to keep an eye on them in the oven.
- Zucchini: Thin slices are key; they release a lot of moisture, so pat them dry thoroughly to get that crisp crunch.
- Carrots: Their earthy flavor adds a nice sweetness, but slicing evenly helps them cook uniformly—use a mandoline if you have one.
Olive oil and sea salt:
- Olive oil: I use just a light brushing—too much oil makes the chips greasy and dulls the crunch, especially with delicate veggies.
- Sea salt: A sprinkle at the end enhances flavor, but do it sparingly—over-salting can overshadow the veggie’s natural taste.
Notes for ingredient swaps
- Dairy-Free: Swap butter for olive oil—less rich, but still flavorful and crisp.
- Vegan: Use coconut oil instead of butter for a subtle coconut aroma and healthy fats.
- Low-Sodium: Reduce salt or substitute with seasoned salt blends—less salty, more complex flavor.
- Gluten-Free: Ensure any added seasonings or spices are gluten-free—no change in crunch or flavor.
- Herbs & Spices: Fresh herbs like thyme or rosemary can replace dried seasonings—add a fragrant, fresh note.
- Sweeteners: A light sprinkle of cinnamon or nutmeg can enhance sweet veggies—use sparingly to avoid overpowering.
- Oil Choices: Avocado oil or sesame oil can add unique flavor profiles—use in moderation for best crispness.
Equipment & Tools
- Mandoline or sharp knife: To slice vegetables evenly thin for crisping.
- Baking sheets: To hold slices during baking and ensure even heat exposure.
- Parchment paper: Prevents sticking and makes cleanup easier.
- Pastry brush or spray bottle: To lightly coat slices with oil for crispness.
- Cooling rack: To cool chips and maintain crispness after baking.
Step-by-step guide to baked veggie chips
- Preheat your oven to 180°C (350°F). Line two baking sheets with parchment paper—this prevents sticking and makes cleanup easier.
- Choose your vegetables: carrots, zucchini, sweet potatoes. Wash and peel if needed. Use a mandoline or sharp knife to slice them as thin as possible, about 1-2 mm. Thinner slices crisp better.
- Arrange the slices in a single layer on the prepared baking sheets. Leave a little space between each piece to allow air circulation.
- Lightly brush or spray the vegetable slices with olive oil—just a thin coating. Sprinkle with a pinch of sea salt and any other seasonings you like (paprika, cumin).
- Bake in the oven for about 15-20 minutes. After 10 minutes, check and rotate the sheets for even browning. Keep an eye on them—they can burn quickly.
- When the edges turn golden and the slices feel crisp when lifted, they’re done. If they’re still bendy, give them a few more minutes but watch closely.
- Remove from oven and let the chips rest on the baking sheet for 2-3 minutes. They’ll crisp up further as they cool slightly.
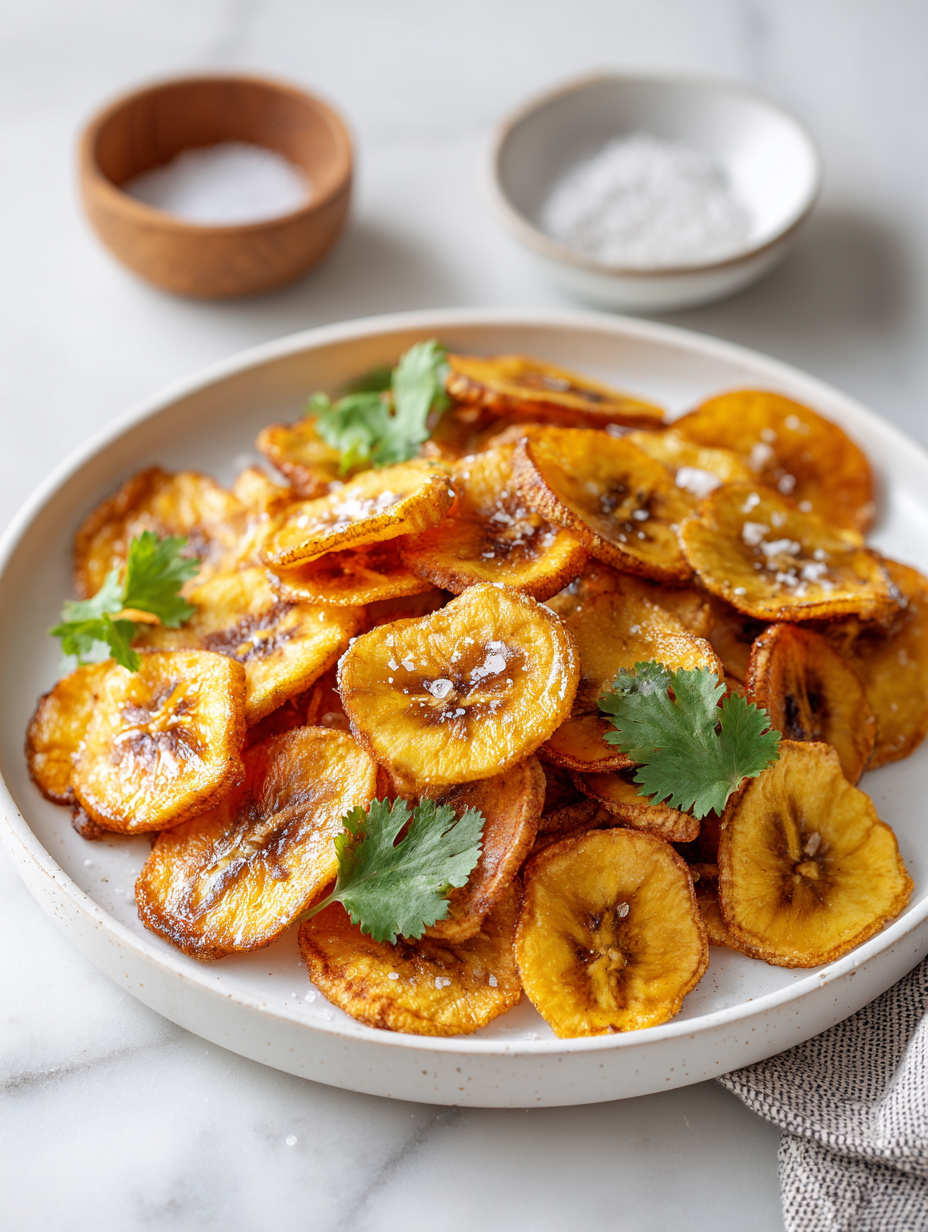
- Transfer to a wire rack if needed to cool completely and prevent sogginess. Serve once cooled—crunchy, fragrant, and snack-ready!
Let the chips rest on the rack for a few minutes to crisp up fully. Serve in a bowl or on a plate, ideally while still slightly warm and fragrant. Keep leftovers in an airtight container for up to 2 days to maintain crunch.
How to Know It’s Done
- Edges are golden brown and slightly puffed with a crispy texture.
- Chips feel firm and crackle when broken or bitten into.
- No visible moisture or dullness—shine and crispness indicate doneness.

Homemade Baked Vegetable Chips
Ingredients
Equipment
Method
- Preheat your oven to 180°C (350°F) and line two baking sheets with parchment paper for easy cleanup.
- Using a mandoline or a very sharp knife, slice the vegetables as thin as possible, about 1-2 mm thick. Aim for even slices to ensure uniform crispness.
- Arrange the vegetable slices in a single layer on the prepared baking sheets, leaving a little space between each piece for air to circulate and crisp evenly.
- Lightly brush or spray the slices with olive oil, making sure each piece gets a thin coating. Sprinkle with a pinch of sea salt and your choice of spices for extra flavor.
- Place the baking sheets in the oven and bake for about 15-20 minutes. After the first 10 minutes, rotate the trays for even browning and keep an eye on them to prevent burning.
- Check the chips around the 15-minute mark; they should be golden brown and feel crisp when gently lifted. If they need a bit more time, bake for another 2-3 minutes, watching closely.
- Remove the chips from the oven and transfer them to a cooling rack. Let them rest for 2-3 minutes to crisp up further as they cool.
- Once cooled, serve immediately for maximum crunch or store in an airtight container for up to 2 days to enjoy fresh, crispy chips later.
Notes
Pro tips for perfect veggie chips
- Boldly slice: Use a mandoline for ultra-thin, even slices that crisp perfectly.
- Boldly oil: Lightly brush or spray veggies; too much dulls the crunch and adds grease.
- Boldly bake: Keep an eye after 10 minutes; chips can turn from perfect to burnt fast.
- Boldly season: Sprinkle salt and spices halfway through baking for even flavor.
- Boldly cool: Rest chips on a rack after baking to prevent sogginess and maintain crispness.
- Boldly watch: Rotate baking sheets midway to ensure uniform browning and crisping.
- Boldly taste: Adjust seasoning while warm for the most vibrant flavor punch.
Common mistakes and how to fix them
- FORGOT to pat vegetables dry → Leaves excess moisture, soggy chips result.
- DUMPED oil too liberally → Causes greasy texture, reduce for crispness.
- OVER-TORCHED chips → Turns bitter, lower oven temp or watch closely.
- UNDERESTIMATED baking time → Chips may be soft, extend baking 2-3 minutes.
Quick fixes and pantry swaps
- When chips are soggy, splash with a little vinegar to revive crispness.
- If chips stick or burn, patch with parchment paper for even baking.
- Dumped too much oil? Shield with a paper towel and bake a few extra minutes.
- Over-torched chips? Rescue by lowering oven temp and adding a minute or two.
- Pantry swap: Use sweet potato for carrots—different flavor, same crispy result.
Prep, store, and reheat tips
- Prep vegetables: Slice and season your veggies a day ahead. Keep them in an airtight container in the fridge— they’ll stay fresh and ready to bake, saving you time and mess on the day of serving.
- Storage: Once baked, store chips in an airtight container at room temperature for up to 2 days. They will lose some crispness over time, so best enjoyed fresh.
- Shelf life: For optimal crunch, consume within 48 hours. After that, they might turn slightly soft but still tasty with a quick re-crisp in the oven.
- Reheating: To revive crispness, warm chips in a 150°C (300°F) oven for 3-5 minutes. Keep an eye on them—they can burn quickly and lose their perfect crunch if overdone.
Top questions about vegetable chips
1. How thin should I slice the vegetables?
Use a sharp knife or mandoline to get thin, even slices—this helps them crisp up properly.
2. Do I need to dry the vegetables first?
Pat the slices dry with a paper towel before baking to remove excess moisture, which prevents sogginess.
3. What temperature and time are best for baking?
Bake at 180°C (350°F) for 15-20 minutes, flipping halfway through to ensure even crisping.
4. How do I know when they’re ready?
Watch them closely after 10 minutes; chips can go from perfect to burnt quickly.
5. How should I store leftover chips?
Store in an airtight container at room temperature; they stay crispy for about 2 days.
6. Can I reheat the chips?
To re-crisp, warm in a 150°C (300°F) oven for 3-5 minutes until crackling sounds return.
7. How much oil should I use?
Use a light brush of olive oil or spray; too much makes them greasy and dull.
8. Can I substitute different vegetables?
Yes, you can swap sweet potatoes with carrots or zucchini, but adjust baking time as needed.
9. Why are my chips uneven or soggy?
Overcrowding causes uneven cooking; keep slices spaced apart on the baking sheet.
10. When should I add seasonings?
Adding seasonings halfway through baking ensures better flavor distribution and prevents burning.
Making these baked vegetable chips has become a bit of a ritual for me, especially when I need a quick, satisfying snack. The smell of roasting veggies and that perfect crunch remind me that simple ingredients can really shine when treated right. It’s a small reminder to slow down and enjoy the little moments, even in the kitchen.
Hopefully, these notes inspire you to experiment with your own veggie combinations and seasonings. There’s something deeply honest about turning humble vegetables into something so crisp and flavorful. It’s a process that feels homemade in every bite, and that’s what makes it special.

Hi, I’m Lily Hayes, the cook, writer, and heart behind Loving This Process. This blog is built on a simple idea that food is not just about the final dish, but about everything that happens while you’re making it. The thinking, the tasting, the adjusting, the learning, and the quiet moments in between. Food has been a constant presence in my life, not as something flashy or perfect, but as something deeply grounding. Cooking has always felt like a process worth savoring, even when it’s messy, slow, or imperfect.


Leave a Reply