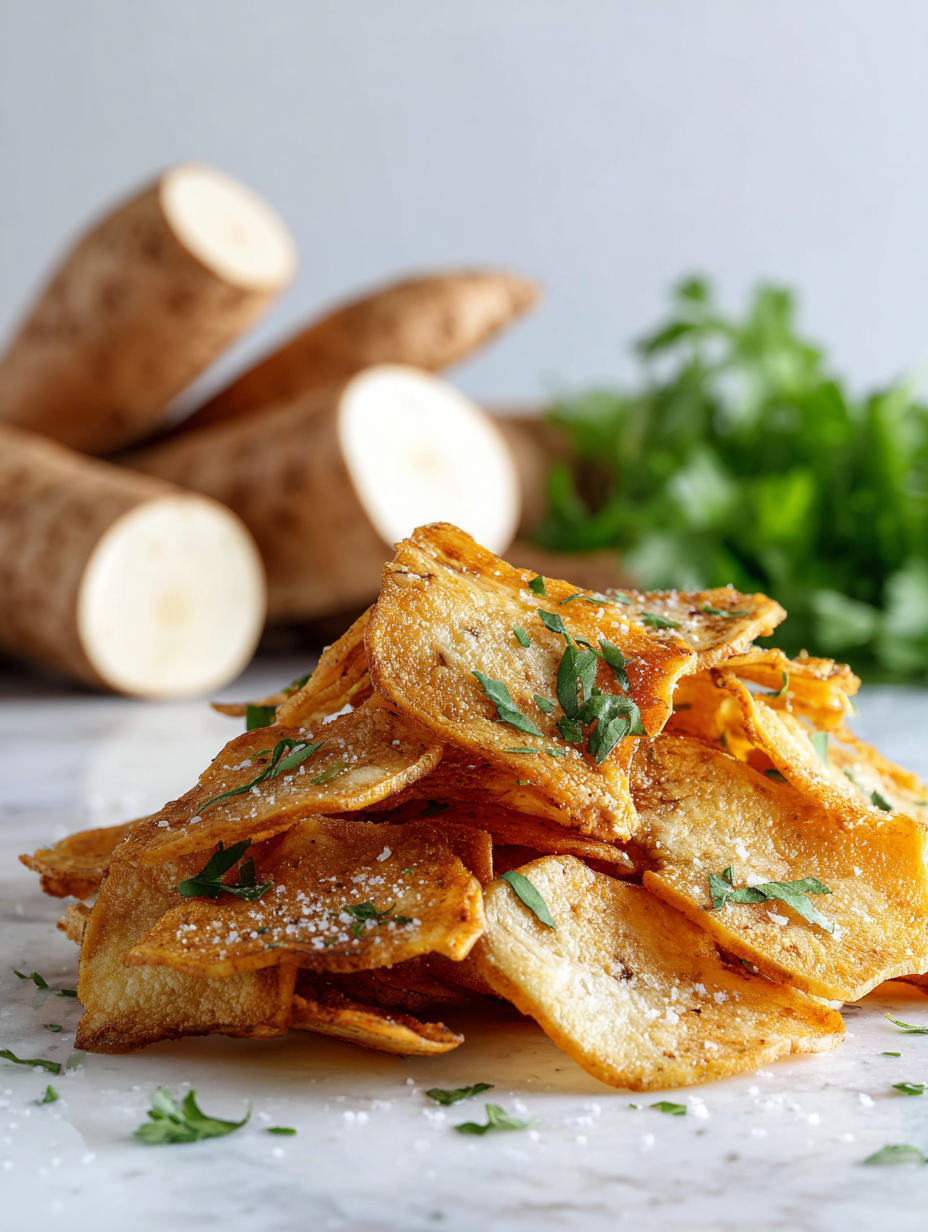
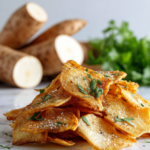
Cassava often gets overlooked in the snack scene, but its natural sweetness and nutty flavor deserve a spotlight. Baking these chips keeps their essence intact, avoiding the greasy heaviness of frying. It’s a simple, honest snack that highlights the humble root’s true character.
I’ve found that baking transforms cassava into something unexpectedly addictive—a crispy, golden treat with a subtle, complex flavor. It’s perfect for a casual crunch or a quick snack when you want something satisfying but not overly processed. Plus, it makes your kitchen smell like toasted warmth, not oil fumes.
This recipe is about celebrating what’s naturally there—no fuss, no artificial flavors, just pure cassava goodness. It’s a reminder that the best snacks can come from simple ingredients, handled with care and patience. A little bit of effort, and you’re rewarded with a snack that’s both nostalgic and refreshingly different.
Focusing on the overlooked beauty of cassava’s natural sweetness and nutty flavor, this recipe transforms humble roots into a crispy, addictive snack without frying, highlighting the simplicity and versatility of baked chips.
The story behind this recipe
I first stumbled upon baked cassava chips during a trip to a small village market in Central America. The locals had a way of turning humble roots into crispy, flavorful snacks that didn’t need much fuss. That simple, honest approach stuck with me, and I’ve been experimenting with baking my own ever since. It’s a way to enjoy cassava’s natural sweetness without overdoing it, and I love how the smell of toasted roots fills the kitchen. Each batch feels like a small act of home cooking, grounded in tradition but perfect for today’s quick snack cravings.
Key ingredients and tips
- Cassava: I love how its starchy, slightly sweet flavor caramelizes as it bakes, creating a smoky, toasted aroma. Swap it with sweet potato if you want a softer, sweeter chip, but the texture won’t be quite the same.
- Olive oil: I prefer a light drizzle for that crisp, golden finish and a hint of fruitiness. You can substitute with avocado oil for a milder flavor or coconut oil for a subtle tropical note—just watch the smoke point.
- Salt: I keep it simple here, just enough to enhance the natural sweetness. Sea salt gives a nice crunch and brightens the flavor; for a different twist, try smoked salt for a richer, deeper punch.
- Paprika or chili powder: I love the smoky kick it adds, especially if I want a little heat. If you’d rather keep it mild, skip the spice or use a pinch of cumin for earthiness without the heat.
- Optional herbs or spices: I sometimes toss in a dash of garlic powder or thyme before baking—really boosts the flavor without overpowering. Keep it light so the cassava’s nutty flavor still shines through.
- Lemon juice: A squeeze right after baking brightens the chips with a fresh zing. Skip if you want a more straightforward, toasted flavor, but it’s a quick way to lift the whole batch.
Spotlight on key ingredients
Cassava:
- I love how its starchy, slightly sweet flavor caramelizes as it bakes, creating a smoky, toasted aroma. Swap it with sweet potato if you want a softer, sweeter chip, but the texture won’t be quite the same.
- Olive oil: I prefer a light drizzle for that crisp, golden finish and a hint of fruitiness. You can substitute with avocado oil for a milder flavor or coconut oil for a subtle tropical note—just watch the smoke point.
- Salt: I keep it simple here, just enough to enhance the natural sweetness. Sea salt gives a nice crunch and brightens the flavor; for a different twist, try smoked salt for a richer, deeper punch.
Spices & Finishings:
- Paprika or chili powder: I love the smoky kick it adds, especially if I want a little heat. If you’d rather keep it mild, skip the spice or use a pinch of cumin for earthiness without the heat.
- Lemon juice: A squeeze right after baking brightens the chips with a fresh zing. Skip if you want a more straightforward, toasted flavor, but it’s a quick way to lift the whole batch.
Notes for ingredient swaps
- Cassava: I love how its starchy, slightly sweet flavor caramelizes as it bakes, creating a smoky, toasted aroma. Swap it with sweet potato if you want a softer, sweeter chip, but the texture won’t be quite the same.
- Olive oil: I prefer a light drizzle for that crisp, golden finish and a hint of fruitiness. You can substitute with avocado oil for a milder flavor or coconut oil for a subtle tropical note—just watch the smoke point.
- Salt: I keep it simple here, just enough to enhance the natural sweetness. Sea salt gives a nice crunch and brightens the flavor; for a different twist, try smoked salt for a richer, deeper punch.
- Paprika or chili powder: I love the smoky kick it adds, especially if I want a little heat. If you’d rather keep it mild, skip the spice or use a pinch of cumin for earthiness without the heat.
- Optional herbs or spices: I sometimes toss in a dash of garlic powder or thyme before baking—really boosts the flavor without overpowering. Keep it light so the cassava’s nutty flavor still shines through.
- Lemon juice: A squeeze right after baking brightens the chips with a fresh zing. Skip if you want a more straightforward, toasted flavor, but it’s a quick way to lift the whole batch.
Equipment & Tools
- Mandoline or sharp knife: Ensures even, thin slices for uniform baking.
- Baking sheet: Provides a flat surface for baking chips.
- Parchment paper: Prevents sticking and makes cleanup easier.
- Mixing bowl: For tossing and coating slices with oil and spices.
- Spatula: Helps spread slices evenly and transfer chips.
Step-by-step guide to baked cassava chips
- Equipment & Tools: Gather a mandoline or sharp knife, baking sheet, parchment paper, mixing bowl, and a spatula. The mandoline ensures even slices, crucial for uniform baking. Parchment keeps chips crispy and prevents sticking.
- Prep cassava: Peel the cassava roots carefully with a vegetable peeler. Slice into very thin rounds, about 1-2 mm thick, using a mandoline or sharp knife. Thinner slices crisp better.
- Rinse and dry: Rinse slices under cold water to remove excess starch. Pat them dry thoroughly with a clean towel or paper towels. Moisture hampers crispness, so this step is key.
- Season: Toss cassava slices with a tablespoon of olive oil, ensuring even coating. Add a pinch of salt and optional spices like smoked paprika or chili powder. Mix well with your hands or a spatula.
- Arrange on baking sheet: Line the sheet with parchment. Spread slices in a single layer, not overlapping. Use a spatula to adjust if needed, ensuring even heat exposure.
- Bake: Preheat oven to 180°C (350°F). Bake for 15-20 minutes. Check at 10 minutes and rotate the sheet for even browning. Keep an eye on color; they should turn golden and crisp around the edges.
- Monitor doneness: Chips should be golden, firm, and crackly when you gently lift one. If they’re still soft or pale, bake a few more minutes but watch for over-torching.
- Cool and rest: Remove from oven. Let chips rest on the sheet for 5 minutes to firm up. They’ll continue to crisp as they cool. Transfer to a wire rack if needed for extra crunch.
- Serve: Once cooled, serve immediately for maximum crunch. Store leftovers in an airtight container for up to 2 days, but best enjoyed fresh.
- Troubleshooting: If chips are soggy, return to oven for a few minutes. If burnt, lower oven temp slightly or watch the baking time more closely. Adjust thickness for next batch if needed.
Let the chips cool on the baking sheet for 5 minutes, then transfer to a wire rack if desired. Serve once fully cooled for maximum crunch and flavor. Store in an airtight container, but best enjoyed fresh within 2 days.
How to Know It’s Done
- Chips are golden and crispy at edges.
- A gentle shake causes a crackling sound.
- Slices are evenly browned and firm.
Baked Cassava Chips
Ingredients
Equipment
Method
- Peel the cassava roots carefully with a vegetable peeler, removing the tough brown skin to reveal the white flesh underneath.
- Using a mandoline or a sharp knife, slice the peeled cassava into very thin rounds, about 1-2 mm thick, ensuring all slices are uniform for even baking.
- Rinse the slices under cold water to remove excess starch, then spread them out on a clean towel or paper towels to thoroughly dry. This step helps achieve crispness.
- In a mixing bowl, toss the dried cassava slices with olive oil, making sure each piece gets a light coating. Add a pinch of salt and optional spices like paprika or chili powder, then toss again to distribute evenly.
- Line a baking sheet with parchment paper, then spread the seasoned slices in a single layer, making sure they do not overlap. This allows hot air to circulate and crisp each chip evenly.
- Preheat your oven to 180°C (350°F). Bake the cassava slices for 15-20 minutes, turning the sheet halfway through to promote even browning. Watch closely after 15 minutes for the perfect golden color.
- Once the chips are golden brown and crispy around the edges, remove the baking sheet from the oven and sprinkle with a few drops of lemon juice if desired. Let them rest for 5 minutes to firm up.
- Transfer the chips to a wire rack or serve directly from the baking sheet. Enjoy these naturally sweet, crunchy snacks immediately for the best texture and flavor.
Notes
Pro tips for crispy cassava chips
- Boldly thin: Use a mandoline for even, cracker-thin slices that crisp up perfectly.
- Boldly dry: Pat slices thoroughly to remove excess moisture—crispness depends on it.
- Boldly season: Toss with oil and spices while slices are still damp for even coating.
- Boldly rotate: Turn the baking sheet halfway through to prevent uneven browning.
- Boldly watch: Chips can go from perfect to burnt quickly—keep an eye at 15 minutes.
- Boldly cool: Let baked chips rest for 5 minutes on the sheet; they’ll firm up as they cool.
- Boldly store: Keep in an airtight container for up to 2 days, but best fresh for crunch.
Common mistakes and how to fix them
- TOO THICK: Slice cassava too thick, chips won’t crisp. Use a mandoline for even thin slices.
- UNDERESTIMATED: Bake at too high temp, chips burn quickly. Lower temp slightly if over-browning.
- MOISTURE: Skipping drying step makes chips soggy. Pat slices thoroughly before baking.
- OVERCOOKED: Baked too long, chips turn bitter. Keep a close eye at 15 minutes and rotate tray.
Quick fixes and pantry swaps
- If chips are soggy, splash with a little extra oil and bake 2 more minutes.
- When slices stick, patch with parchment or use a thin spatula to lift.
- Dumped too much salt? Rinse briefly and pat dry before baking again.
- Over-torched chips? Shield edges with foil and lower oven temp for the next batch.
- When aroma is burnt, reduce heat slightly and watch closely—chips can go from perfect to char in seconds.
Prep, store, and reheat tips
- Prepare cassava slices ahead by peeling and slicing thinly; keep them in water to prevent browning. Drain and pat dry before baking for crispness.
- Store baked chips in an airtight container at room temperature for up to 2 days. Keep away from humidity to maintain crunch.
- Reheat in a 180°C (350°F) oven for 3-5 minutes until warm and crispy again. Listen for a crackle as a sign they’re ready.
- For longer storage, freeze baked chips in a sealed bag for up to a week. Reheat directly from freezer for added crunch.
- Flavor may dull slightly over time; adding a fresh sprinkle of salt or a squeeze of lemon can revive the taste before serving.
Top questions about baked cassava chips
1. How thin should I slice the cassava?
Slice cassava very thinly, about 1-2 mm, to ensure they crisp up and don’t turn soggy.
2. Do I need to dry the cassava slices before baking?
Dry the sliced cassava thoroughly after rinsing to remove excess starch; moisture prevents crispy chips.
3. What’s the ideal baking temperature and time?
Bake at 180°C (350°F) for 15-20 minutes, rotating halfway, until golden and crackly around the edges.
4. Can I skip the parchment paper?
Use parchment paper to prevent sticking and promote even crisping; avoid overcrowding the pan.
5. How should I store baked cassava chips?
Store leftovers in an airtight container at room temperature for up to 2 days for maximum crunch.
6. How do I reheat leftover chips?
Reheat in a 180°C (350°F) oven for 3-5 minutes until crispy and warm again.
7. My chips turned soft after baking, what now?
If chips are soft, return them to the oven and bake a few extra minutes, watching closely to prevent burning.
8. How can I add more flavor to the chips?
For a smoky flavor, toss the slices with paprika or chili powder before baking.
9. What’s the best way to get even slices?
Use a mandoline for even, very thin slices; thicker slices won’t crisp as well.
10. How do I prevent burning the chips?
Avoid over-baking; chips can go from crispy to burnt quickly—keep an eye after 15 minutes.
These baked cassava chips aren’t just a snack—they’re a small ritual, filling the kitchen with a warm, toasted aroma that’s hard to resist. Each bite brings a satisfying crunch and a hint of natural sweetness that’s hard to find in store-bought options.
In a world of quick fixes and processed snacks, this recipe offers a moment of honest, simple pleasure. It’s a reminder that the best snacks come from humble ingredients treated with care, and that sometimes, the simplest things are the most rewarding.

Hi, I’m Lily Hayes, the cook, writer, and heart behind Loving This Process. This blog is built on a simple idea that food is not just about the final dish, but about everything that happens while you’re making it. The thinking, the tasting, the adjusting, the learning, and the quiet moments in between. Food has been a constant presence in my life, not as something flashy or perfect, but as something deeply grounding. Cooking has always felt like a process worth savoring, even when it’s messy, slow, or imperfect.


Leave a Reply