When I first started making vegetable cutlets, I was obsessed with the texture. It’s a bit of a tactile quest—finding that perfect crunch on the outside while keeping the inside soft and almost velvety. Each chop, each mash, feels like a small experiment in balancing these contrasts, and honestly, it’s almost meditative.
Getting that crispy edge takes more than just tossing them in oil. I’ve learned that the way you chop your vegetables—rough versus fine—directly impacts how they hold together and how the crust forms. It’s about paying attention to those tiny, almost subconscious details, and it makes the eating experience so much more satisfying.
Focusing on how the texture of the vegetable cutlets changes with different chopping techniques, and how to achieve that perfect balance between crispy exterior and tender inside, making it almost like a personal tactile experience in each bite.
Tactile joy of perfect texture
- Chopping the vegetables just right feels like a small act of rebellion—each piece more satisfying than the last.
- That first crispy bite still surprises me; I never get tired of the crunch, the soft interior, the aroma of spices.
- Making these cutlets is a chaotic joy, a messy kitchen dance that somehow always ends with a perfect plate.
- There’s a nostalgic thrill in sharing these with friends—simple, honest, and rooted in childhood comfort foods.
- It’s a quiet pride, knowing that each batch is a little bit better than the last, thanks to a tweak or two.
The story behind this recipe
- This recipe came together on a rainy afternoon when I was craving something familiar but with a twist. I wanted the kind of comfort that hits your senses—crisp outside, tender inside, with a burst of flavor in every bite. It’s not just about the ingredients; it’s about that satisfying tactile experience, the play of textures that makes each bite interesting.
- I remember watching my grandma make veggie patties during childhood afternoons. She’d finely chop everything, almost meditative, and I’d sneak tastes of the raw mix—the aroma of spices and fresh veggies always stuck with me. Over the years, I tweaked her method, experimenting with chopping sizes and spice blends, trying to recreate that nostalgic crunch and softness.
- heading
- story_type
Contextual origin, trivia, or history
- Vegetable cutlets have roots in Indian street food, where they evolved as a hearty snack for busy markets.
- The technique of binding vegetables with spices and breadcrumbs dates back to traditional vegetarian cuisine in South Asia.
- In some regions, these patties were originally a way to use leftover vegetables, transforming them into nourishing, portable meals.
- The crispy exterior achieved through shallow frying became popular in the early 20th century, making them a beloved comfort food.
- Over time, variations emerged globally—each culture adding its own twist, from herbs to sauces—showing the dish’s adaptability.
Key Ingredients and Tips
- Potatoes: I prefer russets for their starchy goodness, which makes the cutlets tender inside. If you want lighter texture, try sweet potatoes—just keep in mind they’re sweeter and softer.
- Mixed Vegetables: I use carrots, peas, and beans for color and crunch, but zucchini or bell peppers work well too. Grate them finely for a uniform mash, or coarsely for more bite.
- Spices: I rely on cumin, coriander, and a dash of garam masala. Feel free to tweak the spice blend—more cumin for earthiness or a pinch of chili for heat.
- Binding Agents: I mix in bread crumbs to help hold everything together, and a splash of lemon juice brightens the flavor. Skip breadcrumbs if gluten-free, but add a little ground flaxseed soaked in water for a similar effect.
- Oil: I cook these in neutral oil with a high smoke point—vegetable or sunflower—until they turn golden and crispy. If you like a less greasy version, try baking at 200°C (392°F) until crisp.
- Fresh Herbs: I toss in chopped cilantro or mint for freshness; they add a burst of herbal brightness. Dried herbs work in a pinch but don’t provide the same vibrant flavor.
- Optional Cheese: I sometimes add grated cheese for richness—cheddar or paneer both melt nicely. If vegan, skip cheese and add a splash of nutritional yeast for umami.
Spotlight on key ingredients
Potatoes:
- I prefer russets for their starchy goodness, which makes the cutlets tender inside. If you want lighter texture, try sweet potatoes—just keep in mind they’re sweeter and softer.
- Mixed Vegetables: I use carrots, peas, and beans for color and crunch, but zucchini or bell peppers work well too. Grate them finely for a uniform mash, or coarsely for more bite.
Spices & Herbs:
- Spices: I rely on cumin, coriander, and a dash of garam masala. Feel free to tweak the spice blend—more cumin for earthiness or a pinch of chili for heat.
- Fresh Herbs: I toss in chopped cilantro or mint for freshness; they add a burst of herbal brightness. Dried herbs work in a pinch but don’t provide the same vibrant flavor.
Ingredient Swap Tips
- Dairy-Free: Swap out any cheese for nutritional yeast or omit altogether. You might lose some richness, but the flavor stays bright and punchy.
- Gluten-Free: Replace bread crumbs with ground oats, crushed rice crackers, or almond meal. Keeps the binding but changes the texture slightly.
- Vegan: Use flaxseed meal mixed with water instead of eggs or cheese. It adds moisture and helps bind without sacrificing flavor.
- Low-Sodium: Reduce salt and choose low-sodium soy sauce or omit salt entirely. The spices will shine more in this case.
- Sweet Potatoes: Substitute regular potatoes with sweet potatoes for a vibrant color and a touch of sweetness, especially good in cooler months.
- Vegetable Choices: Feel free to swap carrots and peas with grated zucchini, chopped spinach, or finely diced bell peppers. Just adjust cooking time if needed.
- Oil: Use coconut oil or avocado oil for a different flavor profile or higher smoke point. Be mindful that coconut oil adds a slight sweetness.
Equipment & Tools
- Large pot: Boil potatoes evenly and efficiently.
- Sharp knife: Finely chop vegetables for texture control.
- Grater: Create coarser vegetable textures for variation.
- Mixing bowl: Combine all ingredients thoroughly.
- Non-stick skillet: Cook cutlets evenly without sticking.
- Spatula: Flip the cutlets gently.
- Paper towels: Drain excess oil from fried cutlets.
Step-by-step guide to vegetable cutlets
- Gather all your ingredients and tools before starting—mise en place makes life easier. Use a sharp knife to finely chop vegetables and a grater for coarser textures. Have a large mixing bowl ready for combining everything.
- Boil potatoes in salted water at 100°C (212°F) until tender—about 15 minutes. Drain and mash until smooth, then set aside to cool slightly.
- Finely chop carrots, peas, and beans. For a more uniform mixture, grate the carrots and zucchini; for more bite, coarsely chop the beans. Mix the vegetables into the mashed potatoes.
- Add spices—1 tsp cumin, 1 tsp coriander, a pinch of garam masala—and salt to taste. Squeeze in a little lemon juice for brightness. Mix well until evenly combined. The mixture should be moist but hold together when shaped.
- Incorporate bread crumbs gradually, about 1/2 cup, to help bind the mixture. If the mixture feels too loose, add a little more bread crumbs; if too dry, a splash of water or lemon juice. The consistency should be firm enough to shape into patties.
- Shape the mixture into small, flat patties about 1 cm thick and 5 cm wide. Keep them uniform for even cooking. Place on a tray lined with parchment paper.
- Heat 2-3 tbsp vegetable oil in a non-stick skillet over medium heat—around 160°C (320°F). When the oil shimmers, carefully place the cutlets in the pan, leaving space between each.
- Fry for 4-5 minutes on each side, until golden brown and crispy. Flip gently to avoid breaking. Check for even browning, and adjust heat if the oil smokes or if the crust burns too quickly.
- Once golden, transfer cutlets to a paper towel-lined plate to drain excess oil. Rest for 2 minutes before serving to let the crust set and avoid breakage.
- Serve hot, with a squeeze of lemon or a dipping sauce of your choice. For a crispier finish, you can bake at 200°C (392°F) for 10 minutes before serving, if you prefer less oil.
Let the cutlets rest for a couple of minutes on a paper towel to firm up. Serve immediately with lemon wedges or your favorite chutney. For best texture, eat while hot—crisp and tender in every bite.
How to Know It’s Done
- Cutlets turn golden brown and crispy on the outside.
- The interior feels tender and holds together when pressed.
- A slight crackle sounds when biting into the crust, indicating crispness.
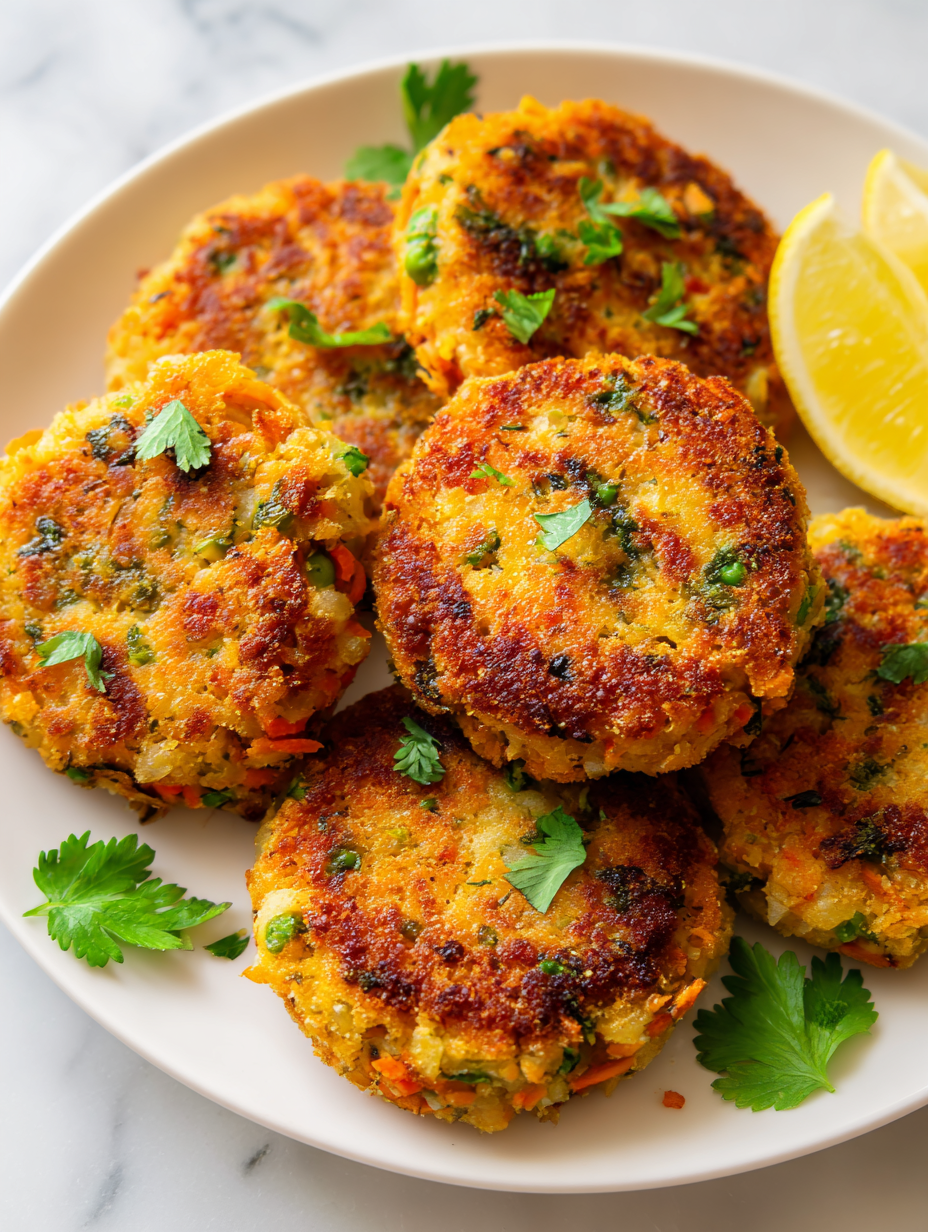
Vegetable Cutlets
Ingredients
Equipment
Method
- Peel and chop the potatoes into small chunks, then place them in a large pot with salted water. Bring to a boil and cook until tender, about 15 minutes. Drain and mash until smooth, then set aside to cool slightly.
- While the potatoes are cooking, finely chop or grate your mixed vegetables—carrots, peas, and beans—to create a uniform, textured mash. Mix the prepared vegetables into the mashed potatoes in a large bowl.
- Add cumin powder, coriander powder, garam masala, and salt to the vegetable mixture. Squeeze in lemon juice and stir well until the spices are evenly distributed, and the mixture is moist but firm enough to shape.
- Gradually fold in bread crumbs until the mixture holds together when shaped. If it feels too loose, add a little more bread crumbs; if too dry, add a splash of water or lemon juice. Chill the mixture for 10 minutes if it feels sticky or loose.
- Divide the mixture into small portions and shape each into a flat, round patty about 1 cm thick. Place the patties on a tray lined with parchment paper.
- Heat vegetable oil in a non-stick skillet over medium heat until shimmering and hot, around 160°C (320°F). Carefully place the patties into the hot oil, leaving space between each.
- Fry the cutlets for about 4-5 minutes on each side, until they turn golden brown and crispy. Flip gently with a spatula, and listen for a satisfying crackle as they fry.
- Transfer the cooked cutlets onto paper towels to drain excess oil. Rest for a couple of minutes to allow the crust to set and stay crispy.
- Garnish with chopped cilantro if desired, and serve the vegetable cutlets hot with lemon wedges or your favorite chutney for an extra burst of flavor.
Pro Tips for Perfect Vegetable Cutlets
- Use a hot pan with enough oil to sizzle—this ensures a crisp, golden exterior.
- Chill the shaped cutlets for 10 minutes before frying—this helps them hold together better during cooking.
- Flip only once when the edges are deep golden and crusted—frequent flipping can break the patties.
- Maintain oil temperature at around 160°C (320°F)—too hot and they burn, too cool and they turn greasy.
- Gently press down on cutlets as they cook—this encourages even browning and crispy edges.
- Use a non-stick skillet for easier flipping and less sticking—clean surface helps achieve an even crust.
- Rest the fried cutlets on paper towels briefly—this absorbs excess oil and keeps them crispy.
Common mistakes and how to fix them
- FORGOT to check oil temperature → Use a thermometer for 160°C (320°F).
- DUMPED mixture too early → Rest for 5 minutes for better binding.
- OVER-TORCHED the cutlets → Lower heat to medium after initial color.
- MISSED flipping at right time → Flip when edges turn golden and crispy.
Quick Fixes and Pantry Swaps
- When oil shimmers, add cutlets; rescue with a splash of water if they stick.
- If mixture feels loose, add a pinch more bread crumbs for better shape.
- DUMPED the oil temperature; patch with a few seconds of high heat for crispness.
- Overcooked the edges; shield with a paper towel and lower heat for even color.
- Splash a little lemon juice or vinegar to brighten up dull flavors mid-cook.
Prep, store, and reheat tips
- Prepare the vegetable mixture and shape the cutlets a day in advance; store in an airtight container in the fridge. The flavors meld overnight, and they’ll be easier to fry fresh.
- Cooked cutlets can be kept in the fridge for up to 2 days. Reheat in a hot skillet for 2-3 minutes per side until crispy and warm. The aroma of spices should be vibrant, and the crust should shimmer with crispness.
- Frozen cutlets can be stored for up to 1 month. Flash freeze on a tray first, then transfer to a zip-top bag. Bake directly from frozen at 200°C (392°F) for about 15 minutes, until golden.
- Reheating in the oven helps restore crispness better than the microwave. Expect a slight loss of initial crunch but still flavorful and tender inside. Use a preheated oven at 180°C (356°F) for best results.
- For best sensory experience, reheat until you hear a gentle crackle when pressing the cutlet—this signals a crispy exterior and warm interior.
Top questions about vegetable cutlets
1. How do I get the perfect texture for my cutlets?
Use a sharp knife to finely chop or grate your vegetables to achieve the right texture for binding and a tender bite.
2. How do I know when the oil is ready for frying?
Ensure your oil is hot enough (around 160°C or 320°F) before frying to get that crispy exterior without burning.
3. My cutlets fall apart while frying, what can I do?
If your mixture feels too loose, add more bread crumbs or ground oats to help hold the shape during frying.
4. Should I chill the cutlets before frying?
Chill the shaped cutlets for 10-15 minutes before frying; this helps them stay together and improves crispness.
5. Can I bake these instead of frying?
Use a non-stick skillet for easier turning and a more even crust. Keep the heat at medium to prevent burning.
6. How can I bake my vegetable cutlets?
Yes, bake at 200°C (392°F) for about 15 minutes, flipping halfway, until golden and crispy for a less greasy option.
7. How do I make vegetable cutlets vegan?
To make the recipe vegan, substitute eggs with a flaxseed or chia seed gel and omit cheese, using nutritional yeast instead.
8. Can I customize the herbs in this recipe?
Adding fresh herbs like cilantro or mint brightens the flavor, especially if the vegetables are mild or bland.
9. How do I reduce excess oil in the finished cutlets?
If your cutlets are too oily, drain them on paper towels immediately after frying and serve while hot for best crunch.
10. How should I store and reheat leftovers?
Store cooked cutlets in the fridge for up to 2 days, reheat in a hot skillet or oven to restore crispness.
These vegetable cutlets are more than just a snack; they’re a reminder of how simple ingredients can come together to create something satisfying and comforting. The crispy exterior and tender inside make each bite a little tactile adventure, especially when you pay attention to the chopping and frying details.
In times when comfort food feels necessary, these cutlets offer a familiar yet fresh experience. They’re versatile, forgiving, and perfect for sharing with someone who appreciates honest, homemade bites. Sometimes, the best moments happen right in your own kitchen, with just a bit of spice and a lot of care.

Hi, I’m Lily Hayes, the cook, writer, and heart behind Loving This Process. This blog is built on a simple idea that food is not just about the final dish, but about everything that happens while you’re making it. The thinking, the tasting, the adjusting, the learning, and the quiet moments in between. Food has been a constant presence in my life, not as something flashy or perfect, but as something deeply grounding. Cooking has always felt like a process worth savoring, even when it’s messy, slow, or imperfect.


Leave a Reply