Vegetable tikkis are the kind of snack that feels like a warm hug after a long day. They’re forgiving, adaptable, and a great way to clear out your fridge clutter. I love tossing in whatever veggies I’ve got—carrots, peas, potatoes—and turning them into something crispy and satisfying.
This recipe is honestly a lifesaver on lazy weekends or when I’m short on time but still craving something homemade. The best part? No two batches are ever alike, and that’s part of the charm. It’s a relaxed, forgiving dish that invites improvisation and makes leftovers feel special.
Focusing on how vegetable tikkis can be a forgiving, forgiving snack that adapts to whatever leftover vegetables you have in the fridge, making it a perfect comfort food for lazy weekends or those quick, cluttered weekday dinners.
Transforming leftovers into crispy bites
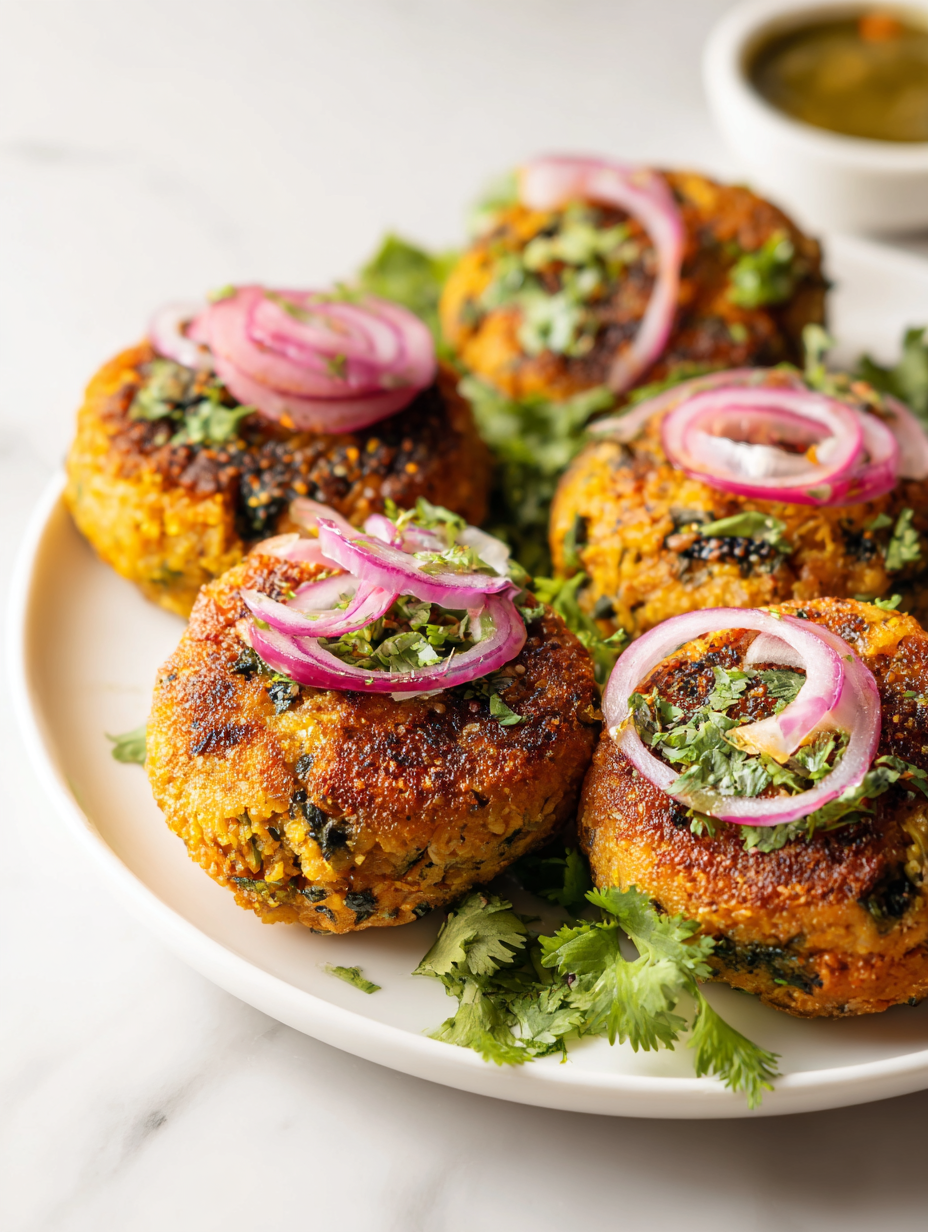
- I love how these tikkis turn leftover vegetables into golden, crispy bites that disappear fast.
- There’s a nostalgic comfort in the aroma of spices frying and veggies seeping into each crispy edge.
- Getting the perfect crunch is oddly satisfying, especially when the edges crackle just right.
- I feel proud when I serve these to friends — they’re simple but always impress.
The story behind this recipe
- This recipe was born from a lazy Sunday afternoon, rummaging through the fridge and realizing I had a mix of odds and ends—carrots, spinach, a lonely potato. Instead of letting them go to waste, I threw them together, hoping for something crispy and comforting. The first batch was a bit rough, but the flavors clicked, and I was hooked.
- Over time, I started tweaking the spices and experimenting with different vegetables, each batch feeling like a little kitchen adventure. It’s become my go-to for turning what might seem like leftovers into something I actually look forward to eating. The process is forgiving, and the results are always satisfying, especially when served with a tangy chutney.
- heading: The story behind this recipe
Trivia and Cultural Roots
- Vegetable tikkis trace their roots to Indian street food, where vendors served up crispy, spiced bites from leftover veggies.
- The name ‘tikki’ comes from the Hindi word ‘tikkha,’ meaning spicy or pungent, reflecting their bold flavor profile.
- Historically, these snacks were a smart way to stretch ingredients, making them a thrifty, flavorful treat for busy markets and homes.
Key ingredients and tips
- Potatoes: I prefer starchy potatoes for that fluffy inside and crispy exterior, but sweet potatoes can add a subtle sweetness if you like. Swap if you’re out, but expect a different texture.
- Mixed Vegetables: I use carrots, peas, and spinach—colorful and sweet, with a vibrant crunch. Frozen peas work perfectly; just thaw and drain. Fresh is even better for a brighter bite.
- Spices: I keep cumin, coriander, and garam masala in my pantry—they give the tikkis that warm, earthy aroma. Adjust to your taste; more garam for depth, less for milder flavor.
- Binding Agent: I rely on chickpea flour (besan) for that nutty flavor and good crunch. If you’re gluten-free, rice flour or breadcrumbs can work, but the bite will be slightly different.
- Oil: I use neutral oil like sunflower or canola for frying—hot enough to crisp but not smoke. If you want less mess, try shallow frying or even baking at 200°C (390°F).
- Fresh Herbs: I love adding cilantro or mint for a fresh punch. They brighten the spices and add a layer of herbal coolness that cuts through the richness.
- Lemon Juice: I squeeze in a little for brightness—just enough to wake up all the flavors. Skip if you prefer milder tikkis, but it’s a small touch that makes a big difference.
Spotlight on key ingredients
Potatoes:
- I love how they become fluffy inside and crisp outside, especially when using starchy varieties. Swap for sweet potatoes for a sweeter, denser bite.
- Mixed Vegetables: Carrots, peas, and spinach add color and crunch. Frozen peas are convenient—just thaw and drain. Fresh spinach keeps the bite bright and vibrant.
Spices:
- Cilantro: I add fresh cilantro for a herbal, cooling contrast. It releases a fragrant aroma as it fries, adding brightness to every bite.
- Cumin, coriander, and garam masala create a warm, earthy aroma. Toast them lightly before adding for extra depth, but watch for over-toasting to avoid bitterness.
Notes for ingredient swaps
- Dairy-Free: Use coconut yogurt instead of regular yogurt for creaminess, but expect a slightly sweeter and tropical note.
- Gluten-Free: Swap wheat flour with rice flour or gluten-free breadcrumbs; the texture will be a bit lighter and less chewy.
- Vegan: Replace eggs with a flaxseed or chia seed slurry (1 tbsp seeds + 3 tbsp water); it binds just as well without the eggs.
- Low-Sodium: Use less salt and rely more on spices and lemon juice to boost flavor without the extra saltiness.
- Fresh Herbs: If cilantro or mint aren’t available, basil or parsley can add a fresh herbal touch, though the flavor profile shifts.
- Vegetables: Feel free to add grated zucchini or bell peppers for more crunch; squeeze out excess moisture to avoid sogginess.
- Oil for Frying: Use a neutral oil like sunflower or canola. For a healthier option, bake at 200°C (390°F) until crispy, about 20 minutes.
Equipment & Tools
- Large mixing bowl: Combine and mix the ingredients thoroughly.
- Grater or knife: Prepare vegetables uniformly.
- Table spoon or scoop: Shape the tikkis evenly.
- Non-stick skillet: Ensure easy flipping and even frying.
- Tongs or spatula: Handle hot tikkis safely.
Step-by-step guide to vegetable tikkis
- Equipment & Tools: Use a large mixing bowl to combine ingredients, a tablespoon for shaping tikkis, and a non-stick skillet for frying. Tongs or a spatula help handle hot tikkis without mess.
- Prep the vegetables: Grate or finely chop 1 cup of carrots, 1 cup of spinach (squeeze out excess moisture), and 1 cup of cooked potatoes. Mix in a bowl.
- Season the mix: Add 1 teaspoon cumin powder, 1 teaspoon coriander, ½ teaspoon garam masala, salt to taste, and a squeeze of lemon juice. Stir well until evenly coated.
- Bind the mixture: Sprinkle in ½ cup chickpea flour (besan) gradually, kneading gently to form a firm but pliable dough. If too sticky, add a bit more flour. If too dry, a splash of water.
- Shape the tikkis: Take small portions, about the size of a ping-pong ball, and flatten into discs about 1.5 cm (½ inch) thick. Keep them uniform for even cooking.
- Heat the pan: Place a non-stick skillet over medium heat (about 180°C / 355°F). Add 2-3 tablespoons of neutral oil, swirling to coat the surface.
- Fry the tikkis: Carefully place them in the hot oil, leaving space between each. Fry for 3-4 minutes per side until golden brown and crispy, with crackling edges. Flip gently.
- Check for doneness: The tikkis should be firm, crisp on the outside, and hold together without breaking. If they stick, lift and check if they need more oil or a gentle flip.
- Rest & serve: Transfer to a paper towel-lined plate to drain excess oil. Serve warm with chutney or yogurt. Let them sit for 1-2 minutes before plating to settle.
Let the tikkis rest for 1-2 minutes on paper towels to drain excess oil. Serve immediately with chutney or yogurt for a crispy, flavorful bite.
How to Know It’s Done
- Tikkis are golden and crispy, with a firm texture when pressed lightly.
- The edges crackle when frying, indicating proper crispness.
- Inside, they should be cooked through, no raw potato or vegetable moistness.
Vegetable Tikkis
Ingredients
Equipment
Method
- Place the mashed potatoes, grated carrots, and chopped spinach in a large mixing bowl. Mix everything thoroughly until well combined and the vegetables are evenly distributed.
- Add cumin powder, coriander powder, garam masala, salt, and lemon juice to the vegetable mixture. Stir well so the spices coat all the ingredients evenly, releasing a warm, fragrant aroma.
- Sprinkle in the chickpea flour gradually, kneading gently to form a firm, pliable dough. If the mixture feels too sticky, add a little more chickpea flour; if too dry, add a splash of water and mix again.
- Divide the dough into small portions and shape each into a disc about 1.5 cm thick, roughly 8-10 cm in diameter. Keep them uniform for even frying and a professional look.
- Heat the neutral oil in a non-stick skillet over medium heat until shimmering and hot—this helps create a crispy exterior.
- Carefully place the shaped tikkis into the hot oil, leaving space between each to prevent sticking. Fry for about 3-4 minutes on each side, until they turn golden brown and crispy with crackling edges.
- Gently flip the tikkis with tongs or a spatula, ensuring they cook evenly on both sides. Adjust the heat if they brown too quickly to avoid burning.
- Once cooked and crispy, transfer the tikkis to a paper towel-lined plate to drain excess oil and keep them crisp.
- Serve the vegetable tikkis warm with your favorite chutney or yogurt for a satisfying snack or light meal.
Pro tips for crispy vegetable tikkis
- Bolded mini-head: Use a hot pan → Ensure the oil shimmers before adding tikkis for a crispy exterior.
- Bolded mini-head: Don’t overcrowd the pan → Fry in batches to prevent steaming and soggy tikkis.
- Bolded mini-head: Flip carefully → Wait until edges are golden and lift easily without breaking.
- Bolded mini-head: Adjust heat as needed → Lower heat if tikkis brown too fast, to cook through evenly.
- Bolded mini-head: Drain excess oil → Rest on paper towels to keep them crisp and avoid greasy bites.
- Bolded mini-head: Use fresh spices → Toast spices lightly before adding to intensify aroma and flavor.
Common mistakes and how to fix them
- FORGOT to keep the oil hot enough → Maintain consistent medium heat, around 180°C (355°F).
- DUMPED all ingredients at once → Mix vegetables and spices evenly before shaping.
- OVER-TORCHED the tikkis → Adjust heat if they brown too quickly; aim for golden, not burnt.
- MISSED resting time → Let tikkis rest 1-2 minutes to settle and avoid breaking during serving.
Quick fixes and pantry swaps
- If oil shimmers, add tikkis quickly to prevent sticking and sogginess.
- When tikkis are too soft, freeze briefly before frying for firmer shape.
- Splash water if mixture is too dry—helps shape tikkis without cracking.
- Patch over burnt edges with a little fresh oil and reduce heat immediately.
- Shield uneven cooking by rotating the pan for even heat distribution.
Prep, store, and reheat tips
- You can prep the vegetable mixture a day ahead; keep it covered in the fridge to retain freshness and prevent drying out.
- Cooked tikkis can be stored in an airtight container in the fridge for up to 2 days. Reheat in a hot skillet until crispy, about 2-3 minutes per side, until they crackle and smell inviting again.
- Raw shaped tikkis freeze well for up to 1 month. Freeze on a tray first, then transfer to a bag. Fry straight from frozen, adding a minute or two to the cooking time.
- Refrigerated or frozen tikkis tend to lose some crispness; reheating in a hot oven at 200°C (390°F) for 8-10 minutes helps restore that crunch. Keep an eye on them—don’t let them burn.
- The flavors deepen overnight, especially if they sit with the spices—so they’re often even better the next day, with a more integrated taste and aroma.
Common Questions About Vegetable Tikkis
1. How do I know if the mixture is right?
Use a mixture of mashed potatoes and grated vegetables, seasoned well. They should hold together but be tender inside.
2. How do I shape the tikkis properly?
Shape the mixture into discs and fry until golden and crispy, about 3-4 minutes per side.
3. What’s the best way to fry them?
Fry tikkis in hot oil (around 180°C/355°F) until crisp and golden. Use tongs to flip gently.
4. Should I rest the tikkis before serving?
Rest them on paper towels for a minute to drain excess oil and keep them crispy.
5. Can I prepare these ahead and freeze them?
Yes, you can freeze shaped but uncooked tikkis for up to a month. Fry directly from frozen.
6. What vegetables are best for tikkis?
Use any firm vegetables like carrots, peas, and spinach. Frozen peas work well—just thaw and drain.
7. Can I modify the spices?
Adjust spices to your taste. More garam masala adds warmth, less keeps it milder.
8. What are good substitutions for chickpea flour?
You can swap chickpea flour for rice flour or breadcrumbs, but expect a slightly different texture.
9. Should I add lemon or lime?
Add a squeeze of lemon juice for brightness. It wakes up all the flavors and adds a slight tang.
10. How do I know when the tikkis are done?
Look for a firm, golden exterior with crackling edges. Inside, the mixture should be cooked through and tender.
These vegetable tikkis are a reminder that simple, forgiving cooking can bring real comfort. There’s a certain satisfaction in turning odds and ends into something crispy and flavorful that everyone loves.
Whenever I make these, I feel a little bit like reclaiming leftovers and transforming them into a homemade treat. They’re perfect for casual gatherings or a quick snack on busy days, and I always end up sneaking a few more bites myself.

Hi, I’m Lily Hayes, the cook, writer, and heart behind Loving This Process. This blog is built on a simple idea that food is not just about the final dish, but about everything that happens while you’re making it. The thinking, the tasting, the adjusting, the learning, and the quiet moments in between. Food has been a constant presence in my life, not as something flashy or perfect, but as something deeply grounding. Cooking has always felt like a process worth savoring, even when it’s messy, slow, or imperfect.


Leave a Reply