When I first started making falafel from scratch, I didn’t realize how crucial resting the mixture was. It’s like giving the flavors a quiet moment to settle, and the texture a chance to firm up just enough. Skipping this step left me with greasy, crumbly falafel more often than I’d like to admit.
This recipe is about patience—letting the chickpeas soak overnight, then giving the mixture a good rest before shaping. The quiet pause makes all the difference, turning a good falafel into something crispy on the outside and tender inside. It’s a small ritual that transforms the whole process into something almost meditative, really worth the extra hour or two.
Focusing on the overlooked importance of resting the falafel mixture to achieve the perfect texture and flavor development.
Resting the Mixture for Perfect Falafel
- The first time I got crispy, golden falafel — I felt like I cracked a secret I didn’t know I needed.
- I cherish how the smell of cumin and garlic fills the kitchen, making everyone gather around eagerly.
- There’s a quiet joy in shaping each ball, knowing they’ll turn into something so satisfying to bite into.
- A failed batch taught me that patience in resting the mixture makes all the difference in texture.
- Nothing beats the thrill of frying up a batch that crackles perfectly and smells deeply savory.
The story behind this recipe
- Making falafel from scratch always takes me back to summer visits to family in Lebanon. My aunt’s kitchen, filled with the scent of fresh herbs and sizzling spices, is where I first fell in love with these crispy bites. It’s a dish that connects me to my roots, even when I’m miles away in my own kitchen.
- The secret to truly great falafel isn’t just the ingredients—it’s the quiet patience of letting the mixture rest. I used to rush straight to frying, only to end up with greasy, uneven balls. Now, I see that giving the mixture a good hour in the fridge allows the flavors to meld and the texture to tighten up, making all the difference.
- heading: ‘The roots of my falafel journey’
Falafel’s Hidden History
- Falafel’s roots trace back over a thousand years, with origins likely in Egypt or the Levant, blending ancient flavors with centuries of tradition.
- In the Middle East, falafel was historically a humble street food, made from leftover chickpeas, fried in simple oil over open flames, creating a crispy, savory snack.
- The word ‘falafel’ possibly derives from the Arabic word ‘fala’ meaning ‘pepper,’ hinting at its original spicy, peppery seasoning before regional adaptations.
Ingredient breakdown: key components
- Dried chickpeas: I prefer soaking them overnight; they develop a nutty aroma and firm texture. Skip the canned to get that authentic bite.
- Fresh herbs (parsley, cilantro): Brightens the falafel with a vivid, grassy freshness. Use a generous handful for a lively flavor, but don’t drown the mixture.
- Garlic: Adds a punch of sharpness and depth. I crush it well to release that pungent aroma, but if you’re sensitive, reduce the quantity slightly.
- Cumin: It’s the soul of the spice blend, smoky and warm. Toast the seeds briefly before grinding for a more pronounced, aromatic kick.
- Onion: I chop it finely for a subtle sweetness and moisture; it keeps the falafel tender inside. Too coarse and it might make the mixture fall apart.
- Flour (or breadcrumbs): Helps bind everything together. I use a bit of chickpea flour for extra flavor, but regular flour works fine if you want a lighter crust.
- Baking soda: Just a pinch makes the falafel lighter and fluffier. Add it right before frying to activate the leavening, watching for that slight fizz.
Spotlight on key ingredients
Chickpeas:
- Dried chickpeas: I soak them overnight; they develop a nutty aroma and firm texture. Skip the canned for authentic bite.
- Fresh herbs (parsley, cilantro): Brightens the falafel with a vivid, grassy freshness. Use a generous handful but don’t drown the mixture.
- Cumin: It’s the soul of the spice blend, smoky and warm. Toast the seeds briefly before grinding for a more pronounced, aromatic kick.
Herbs:
- Fresh herbs: Their vibrant, grassy aroma fills the kitchen; they add brightness and freshness that wake up every bite.
- Cilantro and parsley: During frying, they become slightly crispy around the edges, releasing a fresh, herbal scent that’s almost intoxicating.
- Herb texture: Finely chopping prevents large chunks, ensuring the falafel stays cohesive and flavorful in every bite.
Notes for ingredient swaps
- Dried chickpeas: I soak them overnight for a nutty aroma and firm bite. Skip canned for authentic texture.
- Fresh herbs (parsley, cilantro): Brightens the falafel with grassy notes. Use a generous handful, but avoid overpowering the mixture.
- Garlic: Adds pungency and depth. Crush well to release aroma, but reduce if you prefer milder flavor.
- Cumin: The smoky warmth of toasted seeds elevates flavor. Toast briefly before grinding for more punch.
- Onion: Finely chopped for subtle sweetness and moisture. Coarse chop may cause mixture to fall apart.
- Flour (or breadcrumbs): Binds the mixture. Chickpea flour adds flavor; regular flour keeps it light if preferred.
- Baking soda: Lightens texture with a pinch. Add just before frying and watch for slight fizz to activate.
Equipment & Tools
- Food processor: To finely blend chickpeas and herbs into a coarse mixture.
- Frying pan: For even, consistent frying of falafel at controlled temperature.
- Slotted spoon: To gently lift and drain fried falafel from the oil.
- Paper towels: To absorb excess oil and keep falafel crispy.
Step-by-step guide to falafel
- Gather your equipment: a food processor for blending, a mixing bowl, a frying pan (about 20cm diameter), slotted spoon, and paper towels for draining. Preheat the oil to 180°C (356°F).
- Soak dried chickpeas in plenty of cold water overnight; they should double in size and become tender. Drain well and pat dry.
- In the food processor, combine soaked chickpeas, 3 cloves garlic, a handful of parsley and cilantro, 1 small onion, 1 tsp cumin, 1/2 tsp baking soda, and 1 tsp salt. Pulse until you get a coarse, crumbly mixture. It should hold together when pressed but not be a paste.
- Taste the mixture and adjust salt or herbs if needed. Transfer to a bowl, cover, and refrigerate for at least 1 hour to let flavors meld and mixture firm up.
- Shape the mixture into small balls or patties, about the size of a walnut (roughly 2-3 cm diameter). Keep hands slightly damp to prevent sticking.
- Carefully drop falafel into hot oil, frying in batches if necessary. Cook for 3-4 minutes per batch, turning occasionally, until golden brown and crispy. The oil should crackle gently around each piece.
- Once golden, use a slotted spoon to transfer the falafel onto paper towels. Let drain and cool slightly before serving.
- Serve warm, with pita, tahini, or your favorite toppings. Rest for 2 minutes to let the crust settle before eating.
Let the shaped falafel rest on a plate for 2 minutes before serving. This helps set the crust and makes them easier to handle. Serve immediately while hot and crispy.
How to Know It’s Done
- Falafel should be golden and crispy outside, tender inside.
- The mixture holds shape when formed, not too crumbly or sticky.
- Oil crackles gently when falafel are added, indicating proper temperature.
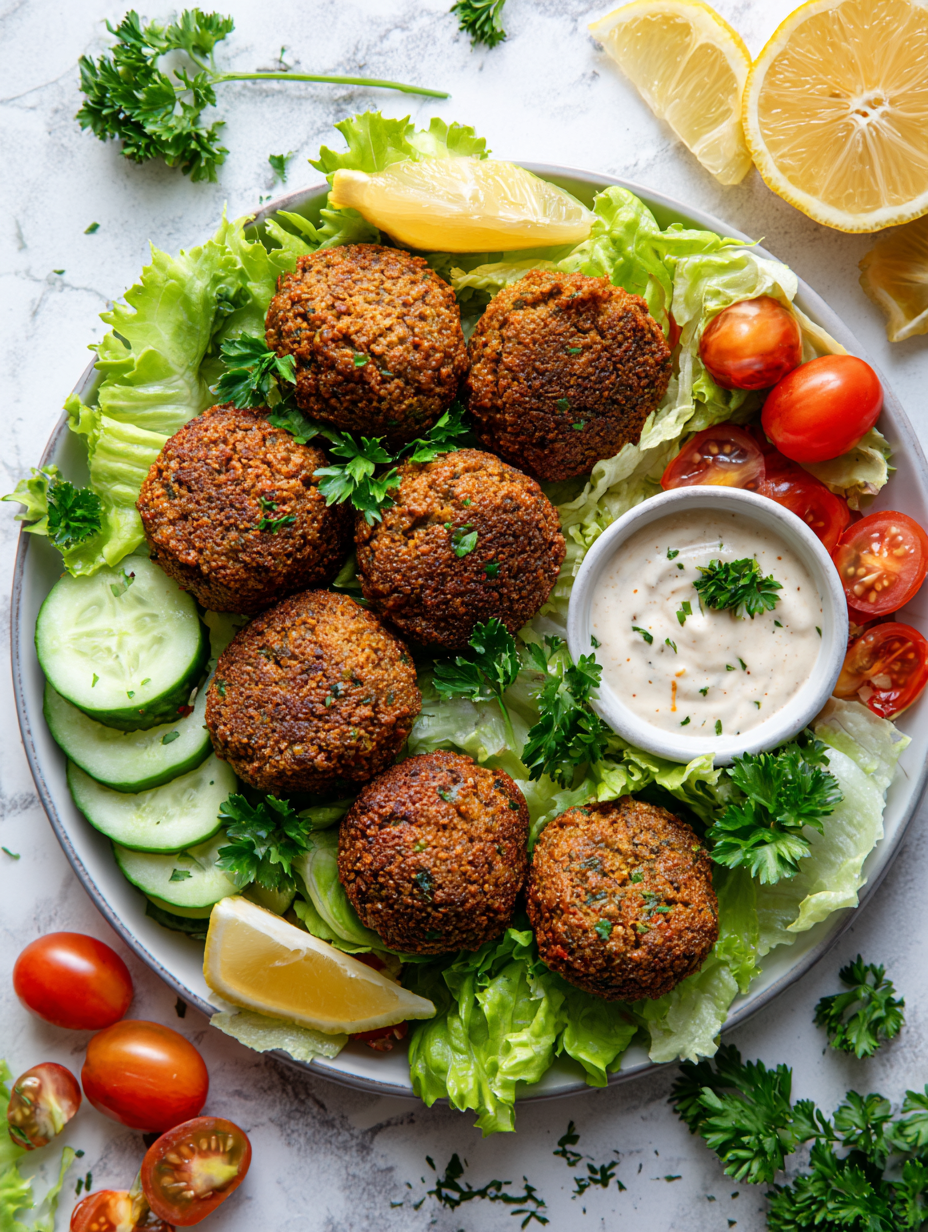
Classic Crispy Falafel
Ingredients
Equipment
Method
- Combine soaked chickpeas, crushed garlic, chopped herbs, finely chopped onion, cumin, and salt in a food processor. Pulse until the mixture is coarse but holds together when pressed, with a slightly grainy texture.
- Transfer the mixture to a bowl, sprinkle in the baking soda and chickpea flour, then mix thoroughly. Cover and refrigerate for at least 1 hour to let flavors meld and the mixture firm up.
- Once rested, scoop out small portions of the mixture and shape into 2-3 cm balls or patties, dampening your hands slightly to prevent sticking. The mixture should be firm but pliable.
- Heat the vegetable oil in a frying pan over medium-high heat until it reaches about 180°C (356°F). You can test the temperature by dropping a small piece of mixture—if it sizzles and bubbles immediately, the oil is ready.
- Carefully add the shaped falafel into the hot oil, frying in batches to avoid overcrowding. Cook for 3-4 minutes, turning occasionally, until the outside is deep golden and crispy, and the interior is tender.
- Use a slotted spoon to lift the falafel out of the oil, then drain on paper towels to remove excess oil and maintain crispiness.
- Repeat the frying process with the remaining mixture, maintaining the oil temperature. Serve the falafel warm, with pita, tahini, or your favorite toppings.
Notes
Essential falafel frying tips
- Bolded mini-head: Chill the mixture well → Cold mixture helps falafel hold shape better during frying.
- Bolded mini-head: Use a food processor → Pulse ingredients briefly to avoid over-processing, keeping texture coarse and rustic.
- Bolded mini-head: Maintain oil temp at 180°C (356°F) → Keeps falafel crispy without burning or greasing out.
- Bolded mini-head: Dampen hands when shaping → Prevents mixture from sticking and ensures even, smooth balls.
- Bolded mini-head: Fry in batches → Avoid overcrowding to maintain consistent heat and crispiness.
- Bolded mini-head: Rest shaped falafel 5 mins before frying → Slight rest helps firm up the shape and reduces spattering.
- Bolded mini-head: Crackling sound indicates proper frying oil temperature → Use a thermometer or listen for the gentle shimmer and crackle.
Common mistakes and how to fix them
- FORGOT to rest the mixture → Rest it for at least 1 hour before frying.
- DUMPED too much oil in pan → Use enough oil to cover half the falafel height.
- OVER-TORCHED the falafel → Keep oil at 180°C (356°F) for even cooking.
- MISSED mixing herbs evenly → Finely chop herbs and pulse briefly for uniform distribution.
Falafel Quick Fixes
- When oil shimmers and crackles, your falafel is ready to fry.
- Splash a bit of water if oil splatters excessively, then lower the heat.
- Patch undercooked falafel with a quick oven bake at 180°C (356°F).
- Shield greasy falafel by draining on fresh paper towels immediately after frying.
- If mixture is too sticky, add a pinch more flour to firm it up.
Prep, store, and reheat tips
- Prep the falafel mixture early: soak chickpeas overnight and refrigerate the blended mixture for easier shaping later. The flavors deepen, and the mixture firms up, making frying smoother.
- Store shaped falafel in an airtight container in the fridge for up to 24 hours. Keep them separated with parchment paper to prevent sticking. The exterior stays crisp if you reheat properly.
- Cooked falafel can be frozen for up to 3 months. Freeze on a tray first, then transfer to a bag. Reheat in the oven at 180°C (356°F) until warmed through and crispy, about 10 minutes.
- Reheating: To restore crispness, bake falafel on a baking sheet at 180°C (356°F) for about 8-10 minutes. They’ll crackle and smell fragrant, just like fresh. Avoid microwaving, which makes them soggy.
Top questions about falafel
1. Can I use canned chickpeas?
Use dried chickpeas, soaked overnight, for authentic texture. Canned chickpeas tend to be too soft and watery.
2. Can I substitute canned chickpeas?
Yes, but you’ll need to drain and dry them thoroughly. Canned chickpeas are softer, so the mixture might be wetter and less cohesive.
3. Why should I rest the falafel mixture?
Rest the mixture for at least an hour in the fridge. It helps the flavors meld and the mixture firm up for better shaping.
4. How do I know when the oil is the right temp?
Keep the oil temperature at around 180°C (356°F). Too hot, and the outside burns before inside cooks; too cool, and falafel absorbs excess oil.
5. How big should I shape the falafel?
Shape the mixture into small balls or patties about 2-3 cm diameter. Slightly damp hands help prevent sticking.
6. Can I fry all at once?
Fry in batches, not overcrowding the pan. This keeps the oil temperature steady and ensures crispy, evenly cooked falafel.
7. How do I know when falafel is cooked?
Falafel is done when it’s deep golden and crispy outside, and firm to the touch. It should not be greasy or soft.
8. Can I add different herbs?
Use fresh herbs like parsley and cilantro for vibrant flavor. Finely chop to avoid large chunks that might fall apart.
9. What if the mixture is too wet?
If the mixture is too sticky to shape, add a teaspoon of chickpea flour or regular flour to help bind it.
10. How do I reheat falafel?
Reheat cooked falafel in the oven at 180°C (356°F) for about 10 minutes. They’ll regain crispness and aroma.
Making falafel with this resting step really changed how I think about the dish. The extra patience rewards you with a crispy crust and a tender inside that’s bursting with flavor. It’s a simple tweak that elevates the entire process from good to memorable.
In a way, it’s a reminder that sometimes, the quiet moments—like letting the mixture rest—are what make the biggest difference. No matter how busy life gets, I always come back to this small ritual. It’s a humble, honest way to keep the essence of good, homemade falafel alive.

Hi, I’m Lily Hayes, the cook, writer, and heart behind Loving This Process. This blog is built on a simple idea that food is not just about the final dish, but about everything that happens while you’re making it. The thinking, the tasting, the adjusting, the learning, and the quiet moments in between. Food has been a constant presence in my life, not as something flashy or perfect, but as something deeply grounding. Cooking has always felt like a process worth savoring, even when it’s messy, slow, or imperfect.


Leave a Reply