Growing up, veggie nuggets were the ultimate snack—crispy on the outside, cheesy inside, and packed with that nostalgic feeling of childhood afternoons. But over time, I started wondering if I could make a version that felt just as comforting but a little more honest about what’s inside. Turns out, you can get that perfect crunch and satisfying bite without relying on overly processed ingredients.
This recipe is my answer to craving familiar flavors while sneaking in a hefty dose of veggies. It’s messy and imperfect, but honest—crisp, tender, and just a little bit better knowing what’s in them. Plus, they’re so easy to customize with whatever greens or roots you’ve got lurking in the fridge. It’s a snack that feels good and tastes just right.
Focusing on the nostalgic comfort of childhood snacks, but giving them a nutritious, veggie-packed twist that appeals to grown-up tastes.
Nostalgic Veggie Snacking
- Making these veggie nuggets feels like reclaiming childhood, but with a grown-up twist I can be proud of.
- I love how messy and imperfect they look—because that’s exactly how homemade comfort food should be.
- There’s a quiet pride in turning simple vegetables into something crispy and satisfying, especially when the kids gobble them up.
- Sometimes, I just crave that nostalgic crunch, but knowing I snuck in extra greens makes it feel a little smarter.
- They remind me that good food doesn’t have to be complicated or perfect—just honest and delicious.
The inspiration behind these nuggets
- This recipe started from a simple craving for those crispy, golden nuggets I used to get from a certain fast-food joint. But I wanted to make a version that felt a little more honest—something I could feel good about serving my family. It was about capturing that crunch and tender bite while sneaking in some extra veggies, no fuss, no additives.
- One afternoon, I had a mountain of leftover roasted carrots, zucchini, and a bag of stale bread. The idea clicked—blend, season, and bake those veggies into something snack-worthy. Now, whenever I make these, I think of that lazy weekend afternoon, turning odds and ends into something surprisingly satisfying.
- heading
- story_type
Trivia and origins of veggie nuggets
- Veggie nuggets have roots in the convenience food boom of the 1980s, adapting fast-food style into healthier snacks.
- Early versions relied heavily on binders and fillers; modern takes focus on whole vegetables and minimal ingredients.
- This snack echoes a time when kids’ lunchboxes were filled with processed shapes, but now we’re reclaiming that crunch with real produce.
- The idea of veggie-based finger foods gained popularity in the health-conscious 2000s, aligning with the rise of plant-based diets.
- Homemade veggie nuggets became a kitchen staple as parents looked for satisfying, nutritious alternatives to store-bought processed snacks.
Key ingredients and tips
- Carrots: I love the natural sweetness and vibrant orange hue, which add moisture and color. Swap with sweet potatoes for a softer bite and a richer flavor.
- Zucchini: It brings a subtle green freshness and helps keep the nuggets tender. If you prefer a firmer texture, try adding a bit more bread crumbs or oats.
- Bread crumbs: They give the nuggets their crunch. Whole wheat or panko work well, but if you want a gluten-free version, try crushed rice crackers or gluten-free panko.
- Cheese (optional): Adds a salty, creamy note that enhances flavor. Skip or reduce for a lighter, dairy-free version, but be prepared for a slightly different melt and richness.
- Eggs: Bind everything together with a shiny, slightly firm crust. For an egg-free version, use a flaxseed or chia seed slurry—just mix 1 tbsp seeds with 3 tbsp water and let sit until gelled.
- Seasonings: I keep it simple with garlic powder, paprika, and a pinch of salt, but feel free to experiment with herbs or a dash of cayenne for heat. Just watch the salt levels if adding extra seasonings.
- Oil: For frying or baking, I prefer neutral oils like vegetable or canola for even crispiness. For baked nuggets, a light brush of oil helps achieve that golden, crispy exterior.
Spotlight on key ingredients
Carrots & Zucchini:
- Carrots: I love their natural sweetness and vibrant orange hue, which add moisture and color. Swap with sweet potatoes for a softer bite and a richer flavor.
- Zucchini: It brings a subtle green freshness and helps keep the nuggets tender. If you prefer a firmer texture, try adding a bit more bread crumbs or oats.
Notes for ingredient swaps
- Dairy-Free: Swap cheese for nutritional yeast or omitted altogether. Expect a slightly less creamy, more savory flavor.
- Gluten-Free: Use crushed rice crackers or gluten-free panko instead of traditional bread crumbs for a crisp crust.
- Egg-Free: Replace with a flaxseed or chia seed slurry—1 tbsp seeds + 3 tbsp water, let sit until gelled—though it may affect binding slightly.
- Vegetable Variations: Spinach or kale can replace zucchini for a different green punch, but chop finely to prevent excess moisture.
- Sweet Potatoes: Use mashed sweet potatoes for a richer, sweeter flavor and softer texture, especially good with a dash of cinnamon.
- Herbs & Spices: Fresh herbs like parsley or cilantro can replace dried seasonings for a fresher, brighter flavor profile.
- Oil Choices: For baking, brush nuggets with olive or avocado oil for extra flavor and crispness, rather than neutral oils.
Equipment & Tools
- Baking sheet: To hold and bake the nuggets evenly.
- Food processor: To finely chop and blend vegetables into a uniform texture.
- Mixing bowls: To combine ingredients thoroughly.
- Spatula: To shape and transfer nuggets onto the baking sheet.
- Oven: To bake the nuggets to crispy perfection.
Guide to Perfect Veggie Nuggets
- Gather your equipment: a baking sheet, a food processor, mixing bowls, and a spatula. Preheat your oven to 200°C (390°F).
- Wash and roughly chop the vegetables—about 1 cup each of carrots and zucchini. Blanch carrots in boiling water for 2 minutes, then drain and cool.
- In a food processor, pulse the veggies until finely minced but not pureed. Transfer to a large mixing bowl.
- Add 1 cup of bread crumbs, 1/2 cup grated cheese (if using), 1 beaten egg, and seasonings—garlic powder, paprika, salt. Mix well until combined. If the mixture feels too wet, sprinkle in more bread crumbs a tablespoon at a time.
- Shape the mixture into small nuggets, about 2 inches long and 1 inch wide. Place on the prepared baking sheet, leaving space between each.
- Lightly brush or spray the nuggets with oil to promote crisping. Bake for 20 minutes, flipping halfway, until golden and crispy around the edges.
- Check for doneness: the nuggets should be firm, golden, and smell toasted. They might crackle slightly when you lift them, indicating crispness.
- Remove from oven and let rest for 5 minutes. Serve warm with your favorite dip or a simple side salad.
Allow the nuggets to rest on the baking sheet for 5 minutes to firm up before serving. Serve warm, with dips or salads, as you like.
How to Know It’s Done
- Golden-brown crust with a slight crackle when lifted.
- Nuggets feel firm but not hard, with a tender interior.
- A fragrant toasted smell indicates proper crisping and cooking.
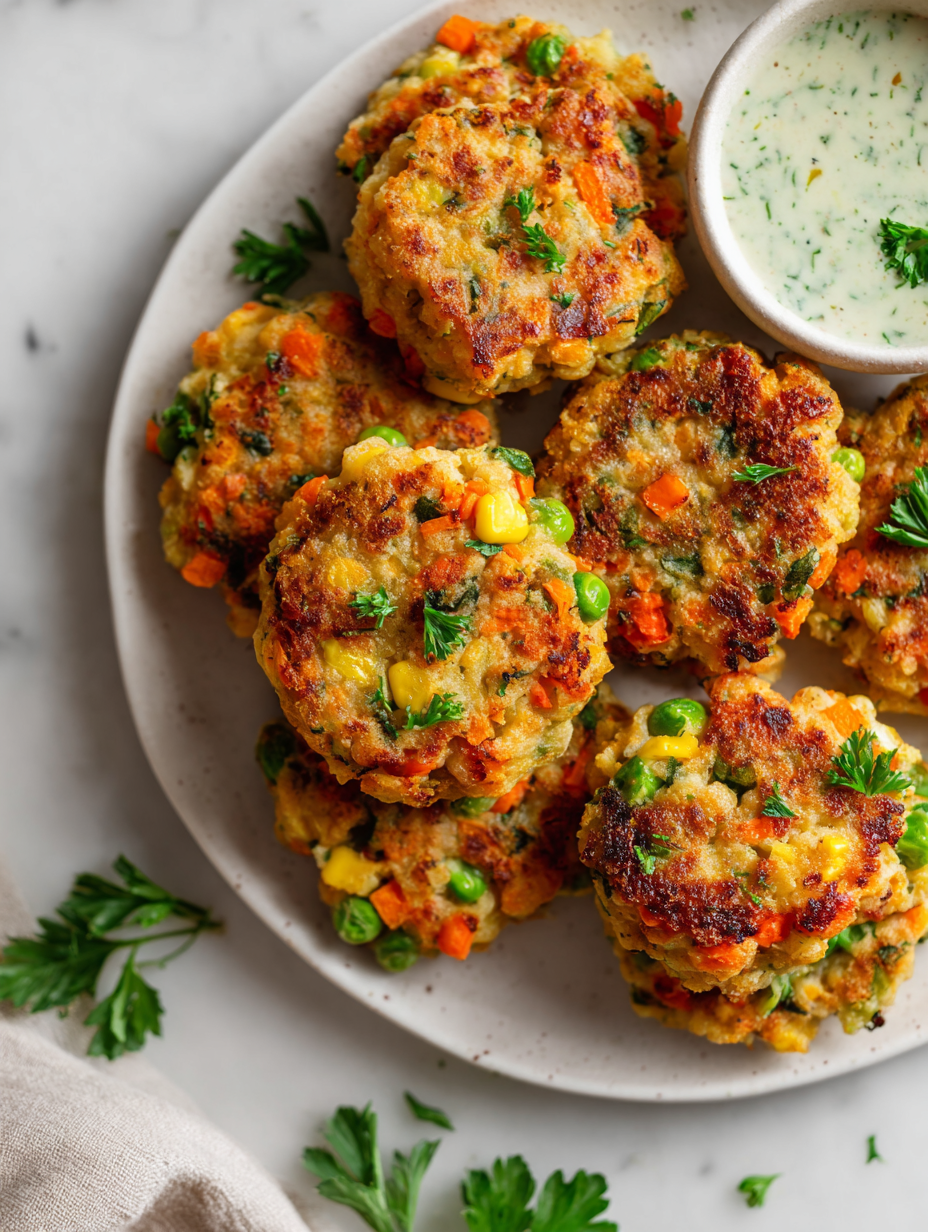
Nostalgic Veggie Nuggets
Ingredients
Equipment
Method
- Start by washing and roughly chopping the carrots and zucchini. Blanch the carrots in boiling water for 2 minutes, then drain and let cool slightly.
- Place the chopped vegetables into a food processor and pulse until finely minced but not pureed. Transfer the mixture into a large mixing bowl.
- Add bread crumbs, grated cheese (if using), beaten egg, garlic powder, paprika, and a pinch of salt to the bowl. Mix everything thoroughly with a spatula until well combined. The mixture should hold together when pressed; if too wet, sprinkle in more bread crumbs.
- Shape the mixture into small nuggets, about 2 inches long and 1 inch wide, using your hands. Place each on the prepared baking sheet lined with parchment paper or a silicone mat.
- Lightly brush or spray the nuggets with oil to help them crisp up during baking. Place the tray in a preheated oven at 200°C (390°F) and bake for 20 minutes, flipping halfway through, until the nuggets turn golden brown and crispy around the edges.
- Once baked, remove the nuggets from the oven and let them rest for 5 minutes. They should be firm, crunchy on the outside, and tender inside. Serve warm with your favorite dip or a simple salad for a satisfying snack or meal.
Tips for Perfect Veggie Nuggets
- Bolded mini-head: Use a gentle touch when shaping nuggets to keep them tender inside.
- Bolded mini-head: Chill the mixture for 10 minutes before shaping—makes handling easier and the nuggets hold better.
- Bolded mini-head: For extra crunch, coat the shaped nuggets in panko breadcrumbs just before baking.
- Bolded mini-head: When baking, flip nuggets halfway through to ensure even crisping on all sides.
- Bolded mini-head: For a quick fix, spray the nuggets with a light mist of oil before the final bake for a golden crust.
- Bolded mini-head: To prevent sticking, line your baking sheet with parchment paper or a silicone mat.
- Bolded mini-head: Keep an eye on the oven; nuggets can go from perfect to overdone quickly—set a timer!
Common mistakes and how to fix them
- FORGOT to preheat the oven → Always preheat to ensure even crisping.
- DUMPED mixture too wet → Add more bread crumbs gradually until firm enough.
- OVER-TORCHED nuggets → Reduce oven temp or shorten baking time; watch for golden edges.
- MISSED resting time → Let nuggets rest 5 minutes for firm, crispy texture.
Quick Fixes and Pantry Swaps
- When mixture feels too wet, splash in more bread crumbs and knead briefly.
- If nuggets crack open during baking, patch with a tiny dab of mixture and press gently.
- When oil shimmers and smells nutty, your pan is ready—don’t rush the heat-up.
- Splash a little water on dry, burnt spots in the oven to reduce smoke and cool slightly.
- When in doubt, swap panko for crushed cornflakes for an extra crispy, smoky finish.
Prep, store, and reheat tips
- Prep the vegetable mixture a day in advance; store in an airtight container in the fridge for up to 24 hours. Expect the mixture to firm up slightly and develop a deeper flavor overnight.
- Shape the nuggets and refrigerate on a tray covered with plastic wrap for up to 12 hours. They may feel firmer and easier to handle when cold.
- Cooked nuggets can be stored in an airtight container in the fridge for 2-3 days. Reheat in a hot oven (200°C/390°F) for 8-10 minutes until crispy and warmed through, with a slight shimmer of oil and audible crackle indicating crispiness.
- Frozen raw or cooked nuggets keep well for up to 1 month. Reheat directly from frozen in a preheated oven at 200°C/390°F for 15-20 minutes, until hot and crispy. Expect a slightly softer interior if reheated from frozen.
- Reheating will soften the crispiness a bit, so for best results, reheat until you smell toasted notes and see a golden exterior. Avoid microwave reheating if you want maximum crunch.
Top questions about Veggie Nuggets
1. Can I use a blender instead of a food processor?
Use a food processor to finely chop the veggies; it helps bind everything together and creates that perfect nugget texture.
2. Is frying necessary or can I bake them?
Yes, you can bake or fry these nuggets. Baking gives a crispy exterior with less oil, while frying is quicker and crunchier.
3. My mixture is too sticky, what should I do?
If the mixture feels too wet, add more bread crumbs gradually until it’s firm enough to shape without sticking to your hands.
4. Can I substitute frozen veggies for fresh ones?
Use frozen vegetables if fresh aren’t available, but make sure they are well drained and chopped finely to avoid excess moisture.
5. How long do leftovers last and how to reheat?
Store cooked nuggets in an airtight container in the fridge for up to 3 days. Reheat in a hot oven until crispy and fragrant, about 8-10 minutes.
6. Can I make this vegan/dairy-free?
Yes, for a dairy-free version, skip the cheese or replace it with nutritional yeast for a cheesy flavor without dairy.
7. How can I enhance the flavor with herbs or spices?
Add herbs like parsley or cilantro after blending for a fresh note, or mix into the dough for a burst of flavor in every bite.
8. My nuggets are over-browning, what now?
If nuggets are browning too quickly, lower the oven temperature slightly or reduce baking time to avoid burning while ensuring they’re cooked through.
9. How do I make the nuggets crispier?
For extra crispiness, coat shaped nuggets in panko breadcrumbs right before baking or frying. It creates a crunchier exterior.
10. Why do my nuggets fall apart when cooking?
Mix the ingredients thoroughly, and chill the mixture for 10 minutes before shaping to prevent them from falling apart during cooking.
These veggie nuggets are a reminder that comfort food can still be honest and nourishing. They’re messy, a little imperfect, but deeply satisfying with that first crispy bite and tender veggie inside.
Whenever I make a batch, I think about how simple ingredients—whatever odds and ends I have—can turn into something genuinely good. It’s a small act of kitchen creativity that always feels right, especially now when snacks matter more than ever.

Hi, I’m Lily Hayes, the cook, writer, and heart behind Loving This Process. This blog is built on a simple idea that food is not just about the final dish, but about everything that happens while you’re making it. The thinking, the tasting, the adjusting, the learning, and the quiet moments in between. Food has been a constant presence in my life, not as something flashy or perfect, but as something deeply grounding. Cooking has always felt like a process worth savoring, even when it’s messy, slow, or imperfect.


Leave a Reply